
GameMaker has a nice trick for sprite sheets. Name a PNG spr_player_strip4.png, drag it into the IDE, and GameMaker cuts it into a four-frame animation on its own. If your sheet is a clean row of same-sized frames, that's the whole import. If it's a grid, or the frame count is wrong, or the frame size doesn't divide evenly, you end up in the Convert to Frames window, which has ten number fields.
This guide covers both: making the sheet, then getting it into GameMaker. First you draw (or draft, then fix) a four-frame walk cycle in a browser tab with Tsubu and export it as a packed sheet with uniform frames. Then you import it: the filename shortcut, the full Import Strip Image dialog, Frames per Row for grid sheets, the origin, the frame speed and the checkbox that decides whether your pixels stay crisp. Every GameMaker step below was checked against the official GameMaker manual on 2026-09-23.
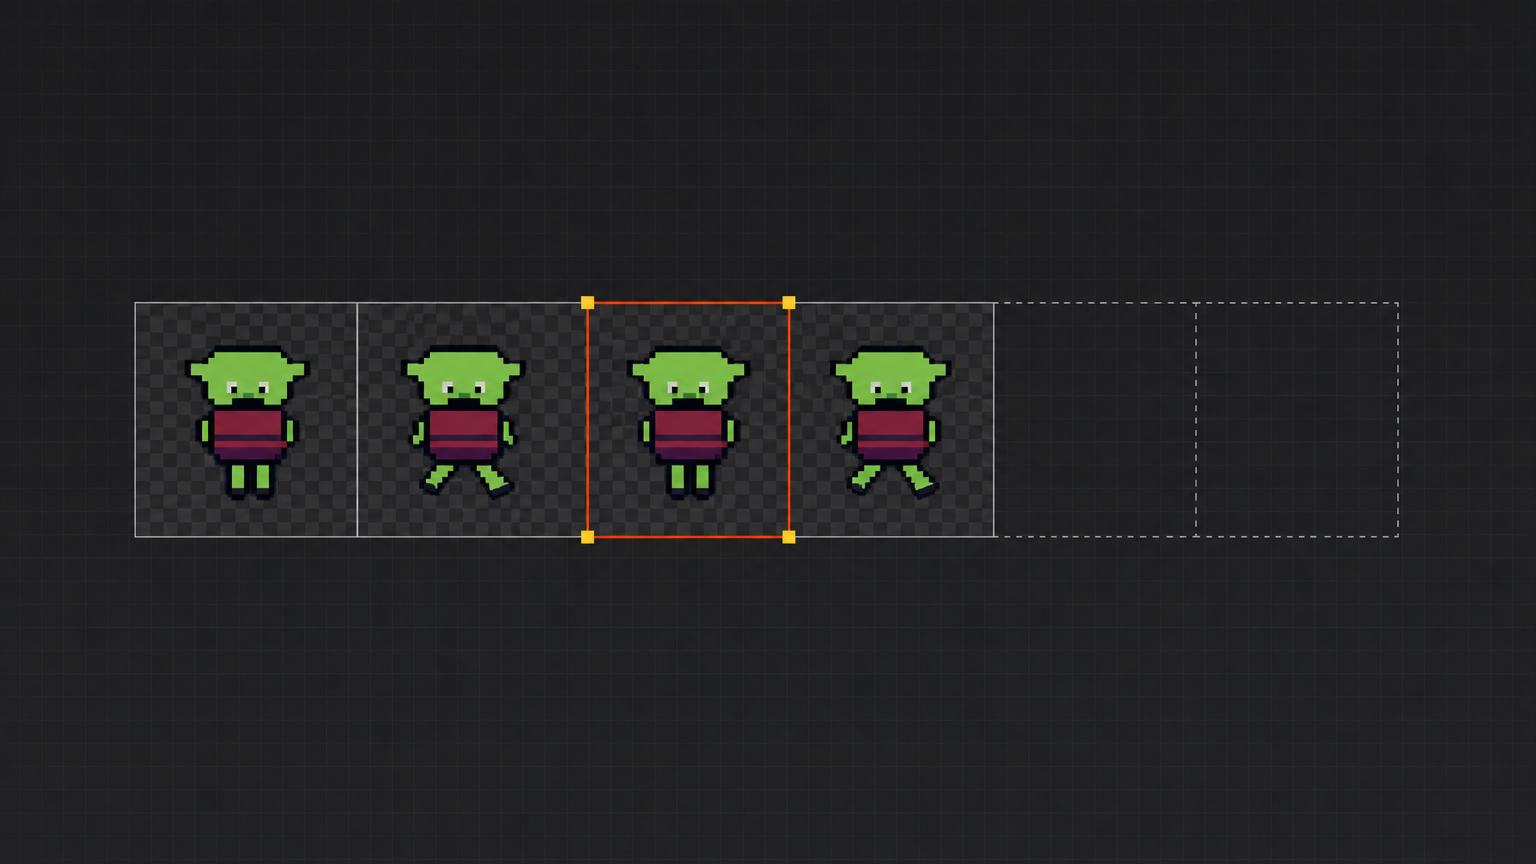
What GameMaker needs from a sheet
GameMaker doesn't read a sheet's metadata. It cuts the image into equal rectangles using numbers you give it. So the sheet has to make those numbers easy:
- Every frame the same size. The cutter moves in fixed steps. One frame two pixels wider than the rest and every frame after it is off.
- A real transparent background. Use alpha, not a white box, or your character walks around inside a visible tile.
- Actual pixels at 1×. A 32 px sprite should be 32 px wide in the file. An upscaled or soft-edged copy gives GameMaker a larger, blurrier texture and a different frame width to type in.
- Four numbers you know: frame count, frame width, frame height and frames per row. Write them down now. You'll type all four into GameMaker.
AI sheet generators already rank for this search and give you a file. What they tend to skip is the rest: whether the frames are really uniform, and what to type into GameMaker. That's what this post is about.
Make the frames
This part is quick, and other posts cover it in depth.
Sign in with Google. Tsubu runs in the browser, so there's nothing to install. During early access the studio is free for early adopters, and AI usage is sponsored by the platform with no credit cap. In the library, create a project, click New asset, set the type to Animation, name it (this example uses Goblin Walk), pick a 32 × 32 grid and start with a couple of frames. Draw the first contact pose, then duplicate it and adjust until you have four frames. Press play and move the Speed slider until the walk looks right. 12 fps is the default and a good place to stop.
Want more detail? How to animate pixel art builds a four-frame walk cycle pose by pose, and how to make pixel art for games covers canvas size, palette and silhouette. If you'd rather not draw the first pose yourself, the AI pixel art generator can draft one on a real grid. Treat that as a first pass you edit, not a finished sprite. One honest note: what these models were trained on is still an open question on our side, so treat AI-drafted frames as a draft you own, and disclose them if you ship them.
Export a sheet with uniform frames
You don't export from inside the editor. Go back to the library, find the asset's card and open its actions menu (the kebab in the card's top-right corner, or right-click the card). Choose Export.
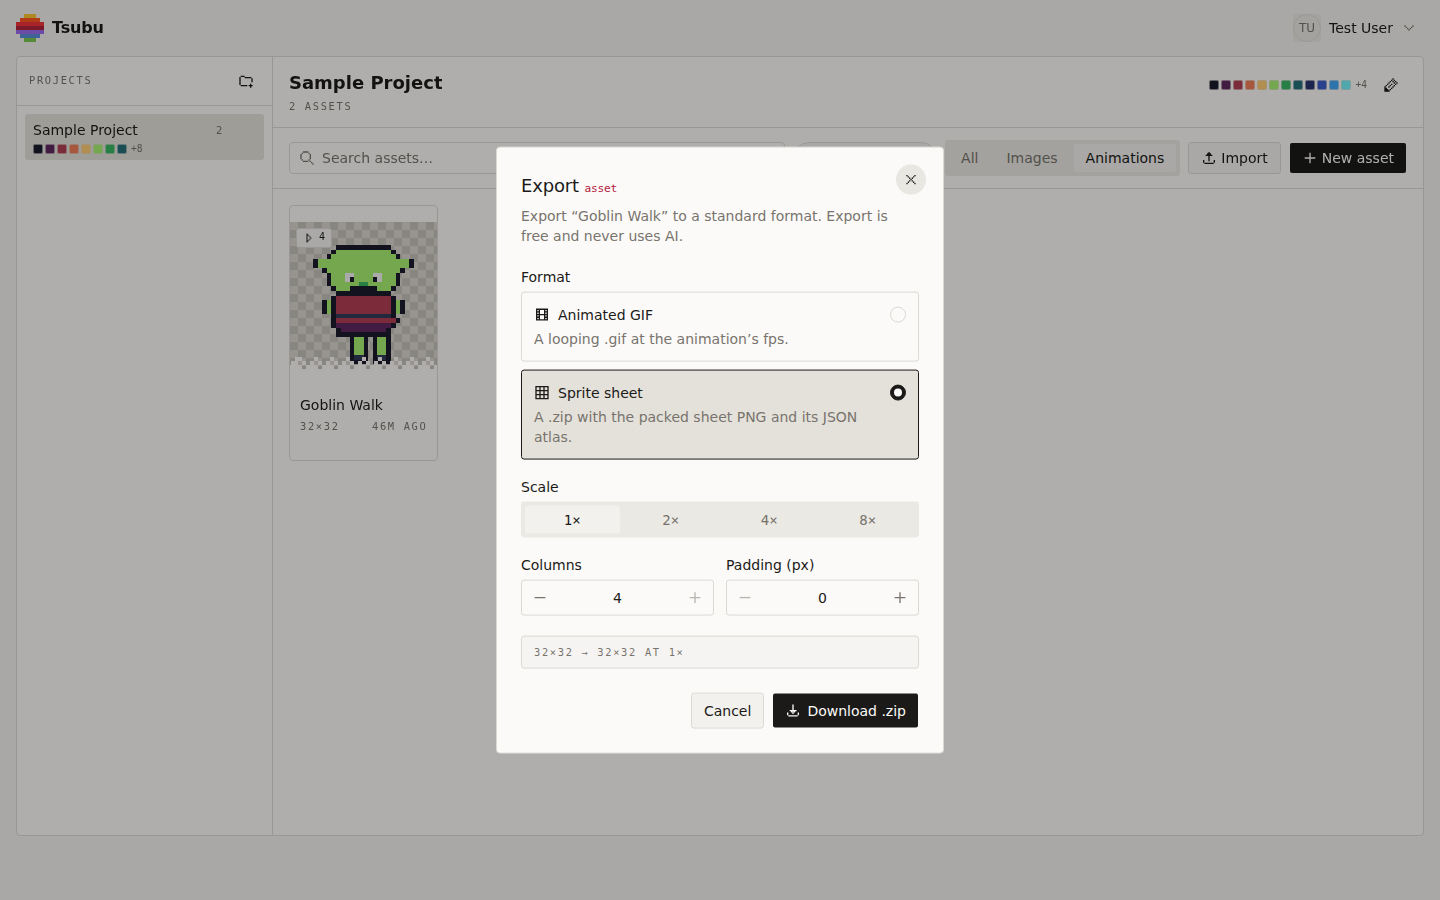
That's the real dialog, opened on the four-frame, 32 × 32 Goblin Walk. Choose Sprite sheet ("a .zip with the packed sheet PNG and its JSON atlas") rather than Animated GIF. Three controls then decide what you'll type into GameMaker:
- Scale: 1×. GameMaker can draw a small sprite large. At 1× the frame width you type matches the size you drew. At 4× the file holds 128 px frames and you'd have to type 128.
- Columns: 4. This defaults to the frame count, so four frames pack into one horizontal row. That's the layout the
_strip4shortcut expects. Set Columns to 2 and you get a 2 × 2 grid. GameMaker can import that too, but only through the dialog, with one extra number to get right (see below). - Padding (px): 0. Padding is the gap Tsubu leaves between cells. At 0 there are no gaps, so every offset and separation field in GameMaker stays at 0.
The line at the bottom shows the frame size, not the sheet size: 32×32 → 32×32 AT 1×. The dialog shows these controls and that line, but no picture of the finished sheet. You'll see the sheet itself in the zip. As the dialog says, export is free and never uses AI. Click Download .zip.
The download is goblin-walk-sheet.zip, with two files inside. goblin-walk.png is 128 × 32: four 32 × 32 frames in one row at x = 0, 32, 64 and 96, with no gaps and transparency intact. goblin-walk.json is an atlas with each frame's rectangle and an 83 ms duration per frame (1000 ÷ 83 ≈ 12 fps). GameMaker's strip import only uses the PNG, but keep the JSON open while you work. It has every number you'll need in the next section.
Import it: the filename shortcut
For a single row of frames, this is the quickest route, and it's in the manual's strip images page: "The name of a strip image file must end with _stripN, where N is the number of frames in the animation."
- Rename the PNG.
goblin-walk.pngbecomesspr_goblin_walk_strip4.png. The hyphen has to go too. GameMaker asset names can only use letters, numbers and underscores, and can't start with a number. - Drag it into GameMaker. The manual lists three ways to bring in a strip image: the Import button in the Sprite Editor, dragging the file into the IDE, or loading it at runtime with
sprite_add(). - Check the result. GameMaker removes the
_strip4part of the name, so the sprite isspr_goblin_walk. It divides the image's total width by N to get the frame width: 128 ÷ 4 = 32. That gives you four 32 × 32 frames.
This only works for sheets in a single row. The manual describes a strip image as frames "laid out horizontally, starting from the left". A grid sheet needs the dialog.
Import it: Import Strip Image, field by field
Use this route for a grid sheet, for a PNG you can't rename, or when you want to see exactly how the image is cut.
Create a sprite (right-click the Asset Browser and choose Create Sprite), then open the strip importer. There are two ways in:
- From the Image Editor. Click Edit Image in the Sprite Editor. Then, in the Image menu, choose Import Strip Image and pick your PNG.
- From the Inspector. With the sprite selected, the Inspector shows an Import Strip button. It opens the same window.
Both open Convert to Frames. (Image > Convert to Frames opens the same window, but it works on an image already in the sprite rather than a file.) Here's what to type for the 128 × 32 Tsubu export:
| Field | Value | Where it comes from |
|---|---|---|
| Number of Frames | 4 | Frame count: the sheet width ÷ the frame width in the JSON |
| Frames per Row | 4 | Tsubu's Columns setting |
| Frame Width | 32 | The dialog readout, or frame.w in the JSON |
| Frame Height | 32 | The dialog readout, or frame.h in the JSON |
| Horizontal / Vertical Cell Offset | 0 | The first frame is in the top-left cell |
| Horizontal / Vertical Pixel Offset | 0 | Tsubu adds no border around the sheet |
| Horizontal / Vertical Separation | 0 | Tsubu's Padding setting |
Check the preview on the right side of the window before you click Convert. The frame outlines should sit exactly on each goblin. If they don't, one of the numbers above is wrong, and that's much easier to fix now than after conversion.
Frames per Row: the grid pitfall
This is the field that trips people up. On a single-row strip, Frames per Row equals Number of Frames, and it's easy to leave them the same by habit.
Now export the same walk with Columns: 2. The sheet is 64 × 64: frames 0 and 1 on the top row, 2 and 3 underneath, filled left to right and top to bottom. Number of Frames is still 4 and each frame is still 32 × 32. But Frames per Row is 2. Leave it at 4 and GameMaker looks for four frames across a row that only holds two, and the frames come out scrambled or cut in the wrong places. The fix is always the same: Frames per Row equals the Columns value you exported with, and Number of Frames equals the actual frame count, which may be less than columns × rows if the last row isn't full.
If you exported with padding, the Separation fields are where that gap goes. The easier fix is to re-export with Padding 0 and set every offset and separation field to 0.
Set the origin
The origin is the point on the sprite that sits at the instance's x/y position. The manual says: "By default, the origin is the top-left corner of the sprite". For a walking character, top-left is rarely what you want. Flipping the sprite, standing it on the ground and lining up its collision all behave more sensibly from a better anchor.
Set it in the Sprite Editor's top bar. Open the origin drop-down and pick a preset. The manual suggests Middle Centre as a common choice, and Bottom Centre for a platformer character so the feet land on the floor. You can also click in the sprite preview to move the origin marker, or type exact x/y values. If every new sprite needs the same anchor, change the Default sprite origin in the Sprite Editor Preferences.
Set the speed: frames per second, or frames per game frame
The Sprite Editor's Frame Speed section has two modes, and they're easy to mix up:
- Frames per second. Animation frames per real-world second. Set it to 12, the rate you tuned in the browser (the JSON's 83 ms per frame).
- Frames per game frame. Animation frames per game step. The manual notes these values "are usually set to 1 or lower (e.g.: a frames per game frame speed of 0.5 will show a new frame every two game steps)".
New sprites default to 30 frames per second (a preference you can change). So a walk tuned at 12 plays two and a half times too fast unless you set it. If you use frames per game frame, divide by your game's speed. The Game Frames Per Second setting defaults to 60, and 12 ÷ 60 = 0.2. Change the game speed later and a frames-per-game-frame animation changes speed with it. A frames-per-second one doesn't.
In code, image_speed multiplies the rate. The manual's example: a sprite set to 10 frames per second with image_speed = 0.5 draws at 5 frames per second.
Keep the pixels crisp
The last setting isn't on the sprite at all. It's a per-platform Game Option. Open Game Options, choose the platform you're building for (Windows, macOS, HTML5 and so on), go to its Graphics section and untick Interpolate colours between pixels. The manual says it plainly: it "turns on linear interpolation, which basically 'smooths' pixels. For crisp pixel graphics, it should be off". Each platform has its own copy of the checkbox, so turn it off for every target you ship.
To switch filtering at runtime instead, gpu_set_texfilter(false) draws textures using the nearest pixel. While you're in GameMaker, if you ever use the Sprite Editor's Scale Image resize on this sprite, leave its linear interpolation option off. The manual's advice is that it "is best left off for pixel art".
If the goblin still looks wrong
- Frames cut through the middle of the character. Frame Width or Height doesn't match the file. Usually that's because the sheet was exported at 2× or higher. Re-export at 1× or type the scaled size.
- The frames are scrambled on a grid sheet. Frames per Row still equals Number of Frames. Set it to the Columns value you exported with.
- A thin line from the next frame at the edge. The sheet has padding the dialog doesn't know about. Set the Separation fields to match, or re-export at Padding 0.
- The walk plays far too fast. The sprite is still on the default 30 frames per second, or it's in frames-per-game-frame mode with a per-second number typed in. Use 12 fps, or 0.2 per game frame at 60.
- Soft, blurry edges in-game but not in the editor. Interpolate colours between pixels is still on for that platform.
- The character floats or turns around a corner. The origin is still top-left.
Where this goes next
- Have your frames already, just need them packed? The sprite sheet maker handles that on its own, without being tied to any engine. Bring in a GIF or an existing sheet (or draw the frames) and download a packed sheet with an atlas. Free packers do this too. The difference here is that the frames stay editable in the same tab.
- Making sprites for your game, not just this one import? Pixel art for games covers the whole workflow: canvas sizes, grid-true export and import notes for Unity, Godot, Phaser and Pixi.
- Working in another engine too? The same Goblin Walk goes into Unity in sprite sheet for Unity and into Phaser in sprite sheet in Phaser.
Make the sheet you're missing
On the GameMaker side you now have a short checklist: a _strip4 name or the Convert to Frames fields, Frames per Row equal to the columns you exported, an origin that fits the character, 12 frames per second rather than the default 30, and pixel interpolation off for every platform.
That leaves the sprite, which is the part no import tutorial can give you.
Open the editor and make your first GameMaker sprite sheet. You sign in with Google, and it's free while we're in early access. New workflow guides are posted to the RSS feed.