
Search for a sprite sheet for Unity and you'll find plenty of good advice about importing one: set Sprite Mode to Multiple, slice it in the Sprite Editor, drag the frames into the scene. Almost all of it starts one step after the hard part — it assumes the sheet already exists. If you're a Unity dev who needs sprites and doesn't primarily draw, that's the step you're stuck on.
So this guide does both halves. First you make a real sheet: four frames of a walk cycle packed into one PNG with a JSON atlas beside it, in a browser tab with Tsubu. Then you import it into Unity properly — which is where most of the words go, because "properly" is about five settings and every one of them has a way of quietly ruining pixel art.
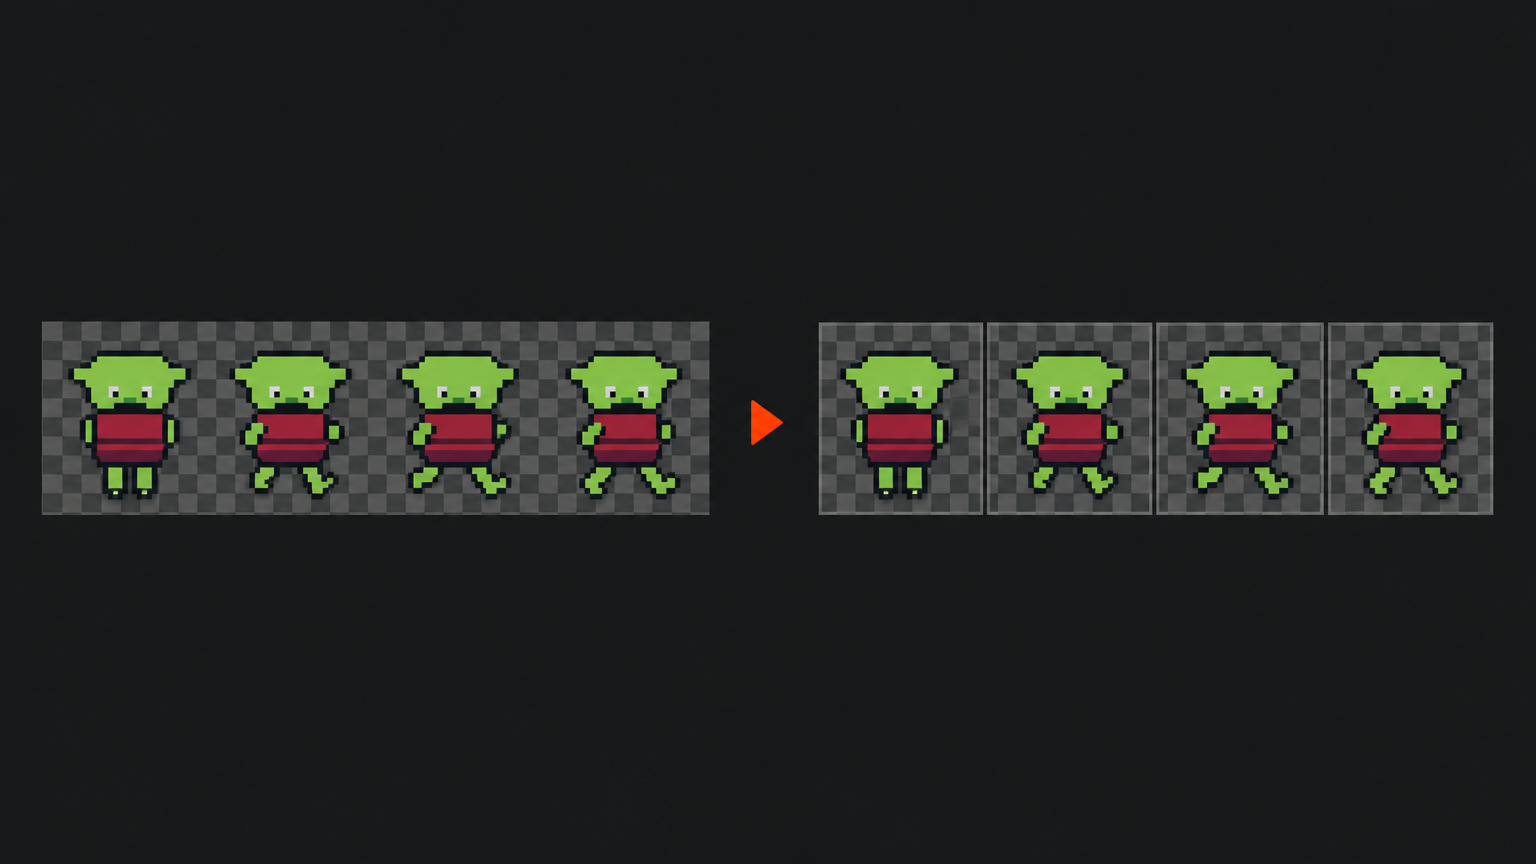
What Unity actually wants from a sheet
Unity's importer is not fussy, but it is literal. Four properties decide whether the import is thirty seconds or an afternoon:
- Uniform cells. Every frame occupies the same rectangle. Unity's grid slicing walks the texture in fixed steps; if frame 3 is two pixels taller than frame 2, the grid lies and every sprite after it is off.
- A genuinely transparent background. Alpha, not a white square. Anything opaque behind the character becomes a visible card in your scene.
- Real pixels, at 1×. A 32 px sprite should be 32 px in the file. An upscaled, soft-edged picture of pixel art imports as exactly that — a blurry texture with no clean edges to slice against.
- Numbers you know. The cell size, the column count and the frame rate. You will type all three into Unity by hand.
That last one matters more than it sounds, and it's the reason the metadata beside the sheet is worth having. Unity slices the PNG itself, on a grid you define — it has no built-in reader for a TexturePacker/Aseprite JSON atlas. (TexturePacker ships its own Unity importer for that, and CodeAndWeb's tutorial is the standard reference; it's a good tool and this isn't a competition.) The atlas is still the thing that stops you guessing: it's where the cell size, the frame positions and the millisecond timings are written down.
Make the frames
This half is quick, and it's covered in depth elsewhere, so here's the short version with pointers.
Sign in with Google — Tsubu runs entirely in the browser, nothing to install — and the studio is free for early adopters while we're in early access, with AI usage sponsored by the platform and no credit cap. In your library, create a project, hit New asset, set Type to Animation, name it, pick a 32 × 32 grid and give it a couple of frames to start. Draw the first contact pose, then duplicate and nudge until you have four; press play and pull the Speed slider until the walk carries the character's weight. Twelve fps is the default and a sane place to land.
Two detours if you want them. How to animate pixel art is the long version of that paragraph — frame counts, FPS and building a four-frame walk cycle pose by pose. How to make pixel art for games is the one before it: canvas size, palette, silhouette, and getting a single sprite clean before you animate anything. And if you'd rather not draw the first pose at all, the AI pixel art generator drafts one on a real grid — a first pass you then edit, never a delivery. Worth saying plainly: what these models were trained on is an unresolved question on our side, so treat AI-drafted frames as a draft you own and disclose them if you ship them.
Export the sheet and its atlas
Here's the part people hunt for, so: there is no export button in the editor. Export lives in the library. Go back to the library, find the asset's card, and open its actions menu — the kebab in the top-right corner of the card, or just right-click the card — then choose Export.
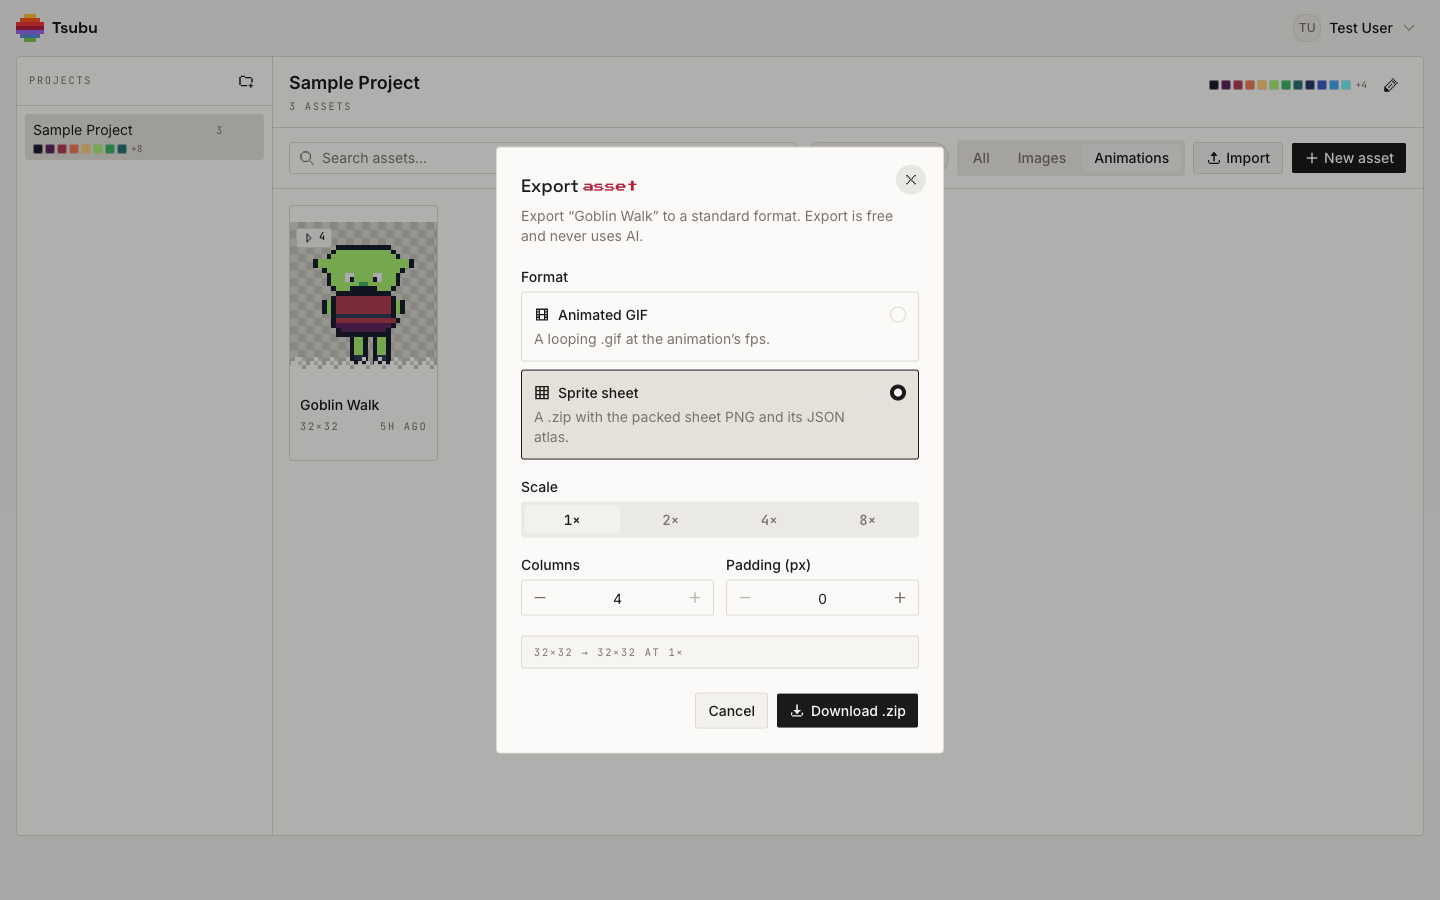
That's the real dialog on a four-frame, 32 × 32 walk cycle. An animation offers two formats: Animated GIF ("a looping .gif at the animation's fps") for a devlog post, and Sprite sheet — "a .zip with the packed sheet PNG and its JSON atlas" — which is the one Unity wants. Pick Sprite sheet and three controls appear:
- Scale — 1×, 2×, 4× or 8×, nearest-neighbour. Take 1×. Unity is perfectly good at scaling sprites and it's the version that stays honest; the higher scales are for things downstream that refuse to zoom. They also change the numbers you'll type in later, which is the next section's problem.
- Columns — defaults to the frame count, so four frames pack as one horizontal strip. That's the friendliest layout for a grid slice. You can drop it to 2 for a 2 × 2 block if you'd rather; Unity slices either shape.
- Padding (px) — leave it at 0. Gaps between cells mean you also have to describe those gaps to Unity's slicer, and a tight grid with point filtering and integer scaling has nothing to bleed. (The sprite sheet how-to covers when padding earns its keep.)
The readout at the bottom reports the frame size, not the sheet size: 32×32 → 32×32 AT 1×. And, as the dialog says, export is free and never uses AI — it's built from pixels your browser already has. Hit Download .zip.
What's in the zip
The download is goblin-walk-sheet.zip, and inside it are exactly two files: goblin-walk.png and goblin-walk.json.
The PNG is 128 × 32 — four 32 × 32 frames in a single row, no gaps, transparency intact. That is the whole sheet.
The JSON is the familiar Aseprite / TexturePacker array atlas. Frame 0 in full:
{
  "frames": [
    {
      "filename": "goblin-walk 0",
      "frame": { "x": 0, "y": 0, "w": 32, "h": 32 },
      "rotated": false,
      "trimmed": false,
      "spriteSourceSize": { "x": 0, "y": 0, "w": 32, "h": 32 },
      "sourceSize": { "w": 32, "h": 32 },
      "duration": 83
    }
  ],
  "meta": {
    "app": "https://tsubu.art",
    "version": "1.0",
    "image": "goblin-walk.png",
    "format": "RGBA8888",
    "size": { "w": 128, "h": 32 },
    "scale": "1",
    "frameTags": [
      { "name": "goblin-walk", "from": 0, "to": 3, "direction": "forward" }
    ]
  }
}
Frames 1 to 3 are the same shape with x at 32, 64 and 96. Four values in there are the ones you'll actually type into Unity:
frame.w/frame.h— 32. The cell size, for slicing by cell size.meta.size.w÷frame.w— 4. The column count, for slicing by cell count.duration— 83 ms. 1000 ÷ 83 ≈ 12 fps, the animation clip's frame rate.frameTags[0].name—goblin-walk. What to call the clip.
Two things worth noticing. The durations are real: 83 ms per frame is the 12 fps you set on the timeline, written out in milliseconds, so the walk plays in Unity at the weight you tuned in the browser rather than at whatever the editor guesses. And the rectangles are in exported pixel space — if you'd taken the 4× scale, the cells would read 128 and you'd be typing 128 into the slicer, not 32. One more reason to export at 1×.
Import it into Unity
Six steps. Unity's own import docs cover the general case; this is the pixel-art path.
1. Bring in the PNG
Unzip, then drag goblin-walk.png into the Project window. Only the PNG — Unity has nothing to do with the JSON, which stays open on your second monitor as the cheat sheet. Select the texture so its import settings fill the Inspector.
2. Texture Type and Sprite Mode
Set Texture Type to Sprite (2D and UI). Then set Sprite Mode to Multiple — the default is Single, which treats the whole 128 × 32 strip as one sprite. Multiple is what tells Unity the texture holds several sprites and unlocks the Sprite Editor's slicing.
3. The two settings that keep pixels crisp
These are the ones that get skipped, and they're why imported pixel art so often looks worse in-engine than it did in the editor.
- Filter Mode → Point (no filter). The default is Bilinear, which blends neighbouring texels — exactly the soft edge you spent an hour avoiding. Point does no blending: one texel, one colour, hard edges.
- Compression → None. Texture compression is lossy and it shows up on flat colours and clean outlines as fringing and blocky mush. A 128 × 32 sheet costs nothing uncompressed.
Leave mip maps off while you're here — they're pre-blurred downscales for textures seen at a distance, which isn't the job a fixed-scale 2D sprite is doing. Then hit Apply.
4. Pixels Per Unit
Pixels Per Unit is Unity's answer to "how big is this thing in the world" — the manual defines it as the number of pixels in the sprite that correspond to one distance unit in world space. It defaults to 100, which means your 32 px goblin is 0.32 units tall and looks tiny next to anything built on a one-unit grid.
There's no universally right value; there's a consistent one. Pick the number of pixels that should equal one world unit and use it everywhere. Setting PPU to 32 for a 32 px character makes it exactly one unit tall, which makes tile maths, collider sizes and camera framing pleasant. Setting it to 16 for 16 px tiles does the same. What you must not do is let different sprites in the same project disagree — that's how a character ends up half the height of a door nobody ever measured.
5. Slice it in the Sprite Editor
With Sprite Mode on Multiple, open the Sprite Editor from the Inspector (it comes with the 2D Sprite package, which ships with Unity's 2D templates). Open the Slice dropdown in the toolbar, and pick whichever of the two grid modes you prefer — both land on the same four sprites:
- Grid By Cell Size, with the pixel size set to 32 × 32. This is the one to reach for by default: it's the sprite's real cell size, and it keeps working if you later append more frames to the sheet.
- Grid By Cell Count, with 4 columns and 1 row. Handy when you know the layout but not the cell size — though you just read both out of the atlas, so you know.
(There's an Automatic mode too, which finds sprites by their transparent gaps. It's genuinely useful for a messy sheet of loose objects, and the wrong tool here: on a walk cycle with limbs that nearly touch it can merge two frames into one rectangle, or trim a frame down to the character's bounding box so your cells stop being uniform. A uniform grid, sliced by the grid, stays uniform.)
Leave the slice's Offset and Padding at zero — that's what the Padding 0 export bought you. Unity previews the cuts as outlines over the texture; when they land on the frame boundaries, Slice, then Apply in the toolbar. Expand the texture in the Project window and you'll find four child sprites in order.
6. Turn the frames into an animation
Select all four child sprites and drag them into the Scene together. Unity does the assembly for you: it creates a GameObject with a Sprite Renderer, adds an Animator with a new Animator Controller, and asks where to save the Animation Clip it just built from your frames. Call it after the frame tag — goblin-walk — and press play.
It will almost certainly run at the wrong speed, because Unity built the clip at its own default rate rather than yours. The number you want is the one from the atlas: duration: 83 ms per frame is 1000 ÷ 83 ≈ 12 fps. Wherever your Unity version exposes the clip's frame rate, set it to 12, and the walk moves at the weight you gave it in the browser.
When it still looks wrong
Five symptoms, in the order they show up:
- Blurry, soft-edged sprites. Filter Mode is still Bilinear. Go back to step 3.
- Fringes and muddy colours around outlines. Texture compression. Set Compression to None and Apply.
- Crisp in the Inspector, shimmering in play mode. The texture is fine and the camera isn't — the sprite is being drawn at a non-integer scale, so one texel lands on 1.4 screen pixels. Unity's 2D Pixel Perfect package exists for exactly this: its Pixel Perfect Camera component keeps pixel art, in its own words, "crisp and clear at different resolutions, and stable in motion". Point its pixels-per-unit setting at the same PPU you gave your sprites.
- The character is the wrong size in the scene. Pixels Per Unit — probably still 100 on this sprite while everything else is on 32, or the other way round.
- Slices land half a frame off. Either the cell size doesn't match the atlas (check whether you exported at 1×), or the sheet's frames aren't uniform. Uniform cells are the one thing the export guarantees, so this is usually the first cause.
Where this goes next
- Only need the packing step? If your frames already exist as loose files or a GIF, the sprite sheet maker does that one engine-agnostic job — drop them in, pack, download the sheet and atlas. It names Unity, Godot, Phaser and Pixi evenly and doesn't bake in any engine's quirks. Free packers do this too; the difference here is that the frames stay editable in the same tab.
- Want the packing job explained? How to make a sprite sheet is the long-form version — what a sheet and an atlas are, frame sizes, padding, and the questions everyone asks the first time.
- Shipping on more than one engine? Pixel art for your game engine is the cross-engine overview: canvas sizes, grid-true export and per-engine import for Unity, Godot, Phaser and Pixi.
- On Godot too? Pixel art for Godot is the Godot-side twin of this post — AnimatedSprite2D with SpriteFrames, or a Sprite2D's Hframes/Vframes.
Make the sheet you're missing
The Unity side of this is a checklist you now have: Sprite (2D and UI), Multiple, Point, no compression, a PPU you keep consistent, a grid slice at the cell size the atlas gave you, and a clip set to the fps you tuned. It stops being fiddly the second time.
The other half is the sprite, and that's the part no import tutorial can hand you.
Open the editor and make your first Unity sprite sheet — free while we're in early access, sign in with Google. New workflow guides land on the RSS feed.