
A sprite standing still is a drawing. A sprite that walks is a character — and the distance between the two is shorter than it looks: four small pictures, played in a loop, at the right speed. This is a do-it-with-me guide to animating pixel art. First the fundamentals, in the order you actually need them: what a frame is, how many a walk cycle needs, how fast to play them, and what onion skinning is. Then you build the thing yourself — a looping four-frame walk cycle in Tsubu, in the browser — and export it when it reads right.
A frame, a loop, and two numbers
A frame is one complete drawing of your sprite. An animation is a handful of frames shown in order, over and over: a flipbook that never runs out of pages. Pixel art is animated the traditional way — frame by frame, each pose drawn by hand — which is why it rewards small canvases and small frame counts. Nothing is tweened for you: every pose on screen is a pose somebody placed.
Two rules follow from that, and they decide almost everything:
- Every frame shares one canvas size. 16×16 for a small character, 32×32 when you want room for a face and a stride. Keep it fixed and your engine can slice the exported sheet on an honest grid. In Tsubu the grid is set when you create the asset and every frame of that animation inherits it, so they cannot drift apart.
- Motion is frame count plus playback speed. How many drawings you make, and how many of them go past per second. Get those two right and a four-frame walk sells the illusion; get them wrong and thirty frames still look wrong.
How many frames does a walk cycle need?
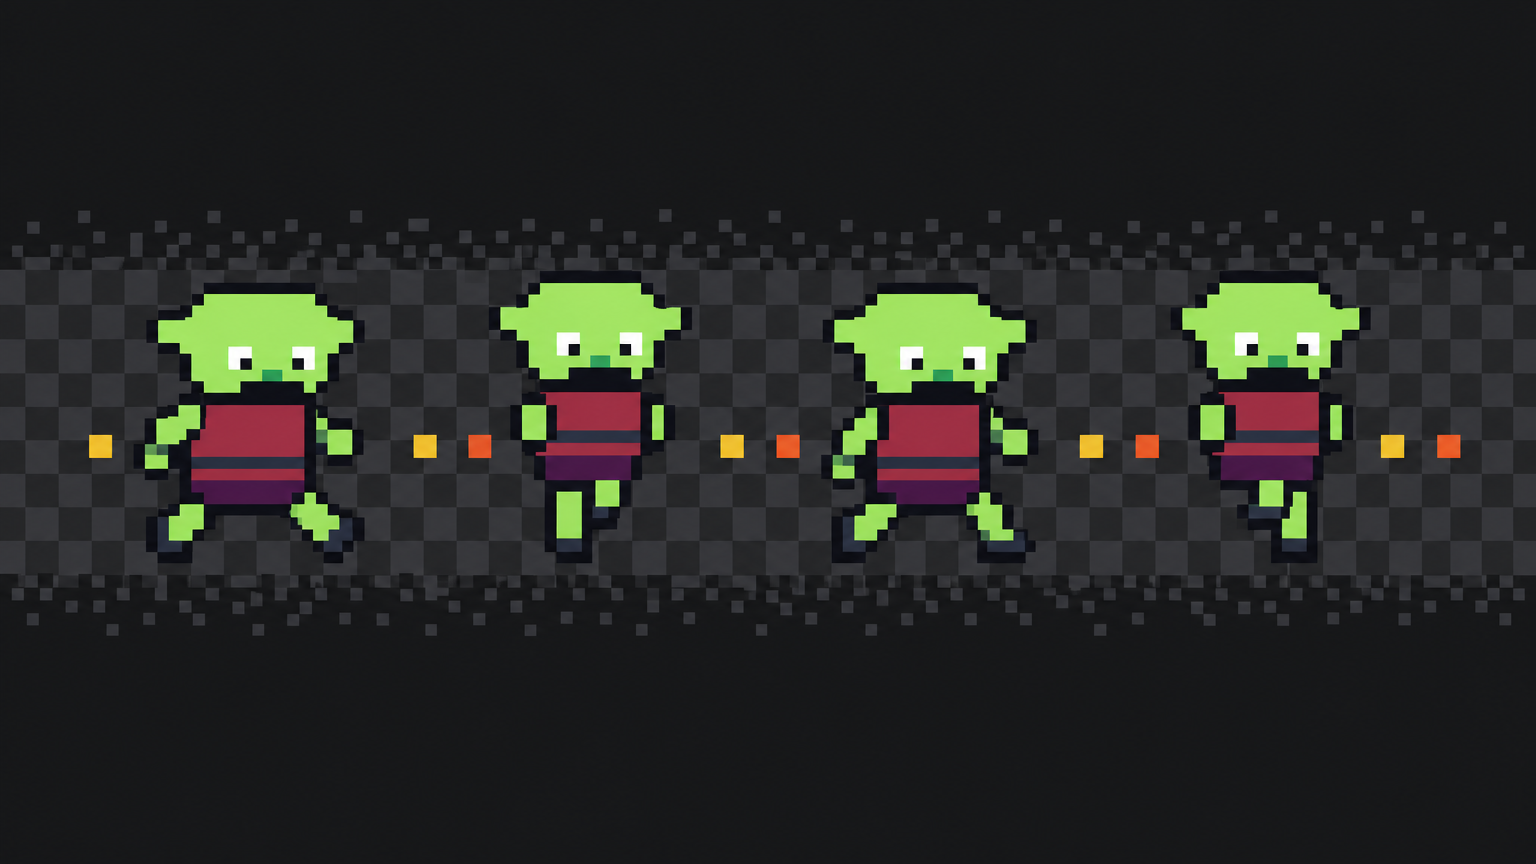
Four is the honest minimum, and it is a real one: four drawings, cycled, read unmistakably as walking. The classic set is two contact poses (one leg forward, then the other) with a passing pose between each, where the moving leg swings under the body and the head dips a pixel or two.
Go to six or eight and the walk gets smoother and heavier; eight is roughly where most pixel walk cycles top out, a ceiling the craft settled on long ago — Slynyrd's human walk cycle breakdown is the reference most people learn it from. Beyond that you are drawing more pixels for motion nobody perceives. Other loops need even less: an idle can be two or three frames, a blink two.
Tsubu's timeline holds up to 32 frames per animation, so there is headroom if you want it. Start at four anyway. It is faster to add frames to a loop that already reads than to fix a sixteen-frame loop that doesn't.
FPS: how fast the frames go past
FPS — frames per second — is the other half. Pixel animation generally reads best somewhere around 8 to 12 FPS: slow enough to keep that deliberate, hand-placed feel, fast enough to flow. Twelve is a sane starting point and is what Tsubu's timeline defaults to. From there, slower suits an idle or a heavy creature; faster suits a run, a dash or an attack that needs to snap.
Those are starting points, not laws. The real instruction is to put the loop on screen and move the speed slider while it plays — your eyes will tell you almost immediately, and they are more reliable than any number in a blog post. Tsubu's Speed control runs from 1 to 30 FPS and applies live while the animation is playing.
Worth knowing before you pick a value: it is not just a preview setting. The speed you land on is exported with the animation — an exported GIF plays at it, and the JSON atlas in a sprite-sheet export records each frame's duration in milliseconds derived from it. One global speed covers the whole animation; frames all hold for the same length of time, so if you want a pose to linger, give it two frames.
Onion skinning — and what to do without it
Onion skinning shows a ghosted, semi-transparent copy of the neighbouring frames underneath the one you're drawing, so you can line a raised foot up against where it was and see the arc of the motion instead of guessing it. It is a genuinely useful animation fundamental and it is why desktop editors like Aseprite have had it for years.
Tsubu does not have onion skinning. It isn't in the editor today, so don't go hunting the toolbar for it — and here is the workflow that gets you an aligned walk cycle without it:
- Duplicate instead of redraw. Duplicating a frame drops an exact copy right after it and puts you on the copy. The body, the palette and the alignment are already correct; you only move the parts that should move. Every pose in the cycle below starts as a duplicate of the one before it, which is how you keep a character from swimming around inside its own canvas.
- Flip between frames instead of ghosting them. Press
,and.to step back and forward a frame, orHomeandEndto jump to the ends. Flicking between two frames catches a jumping shoulder faster than staring at either one. - Judge it playing, not still. Press play and watch the loop. A pose that looks wrong frozen often reads fine at 12 FPS, and vice versa.
Build it: a four-frame walk cycle
Everything below happens in the real editor, in a browser tab. Sign in with Google — there's nothing to install, and the whole studio is free for early adopters while we're in early access, with AI usage sponsored by the platform and no credit cap.
1. Create the animation. In your library, make a project, then hit Create. Set Type to Animation, name it something like hero-walk, set the grid to 32 × 32, and set Frames to 2 — you'll grow the cycle by duplicating, so two is all you need to start. The dialog notes that fps defaults to 12 and is set later, in the editor. Leave Generate with AI off; this one is by hand.
2. Draw the first contact pose. The editor opens on frame 1: pixel canvas in the middle, tools down the left (pencil is B), palette on the right. The checkerboard is transparency — whatever stays checkered is a hole in your sprite, which is exactly what you want around a character. Draw your sprite mid-stride with one leg forward and one back, weight on the front foot. Keep the palette small; a handful of swatches across the whole cycle keeps it coherent, and slots 0–9 are on Ctrl+0…9.
3. Duplicate, then move one thing. Hit Duplicate in the frames toolbar. A copy of frame 1 lands as frame 2 and becomes the frame you're editing. Turn it into the passing pose: the back leg swings under the body, the front leg straightens, the head drops a pixel. Don't redraw the torso — it's already right.
4. Duplicate twice more. From the passing pose, duplicate again and swap which leg leads: that's your opposite contact. Duplicate once more and make the second passing pose, the mirror of the first. Each frame starts life as a pixel-perfect copy of the one before it, so the character stays put and only the stride moves.
5. Tidy the strip. You have one empty frame left over from setup, sitting at the end. Press End to jump to it and hit Delete in the frames toolbar. The counter now reads Frames · 4 / 32.
6. Play it. Press play. The main canvas animates in place — there's no separate preview window, the thing you drew on is the preview — and it always loops. Now drag the Speed slider while it runs. Start at 12 FPS, drop to 8 and feel the walk get heavier, push it up and watch it turn into a jog. Land wherever the walk looks like the character's own weight.
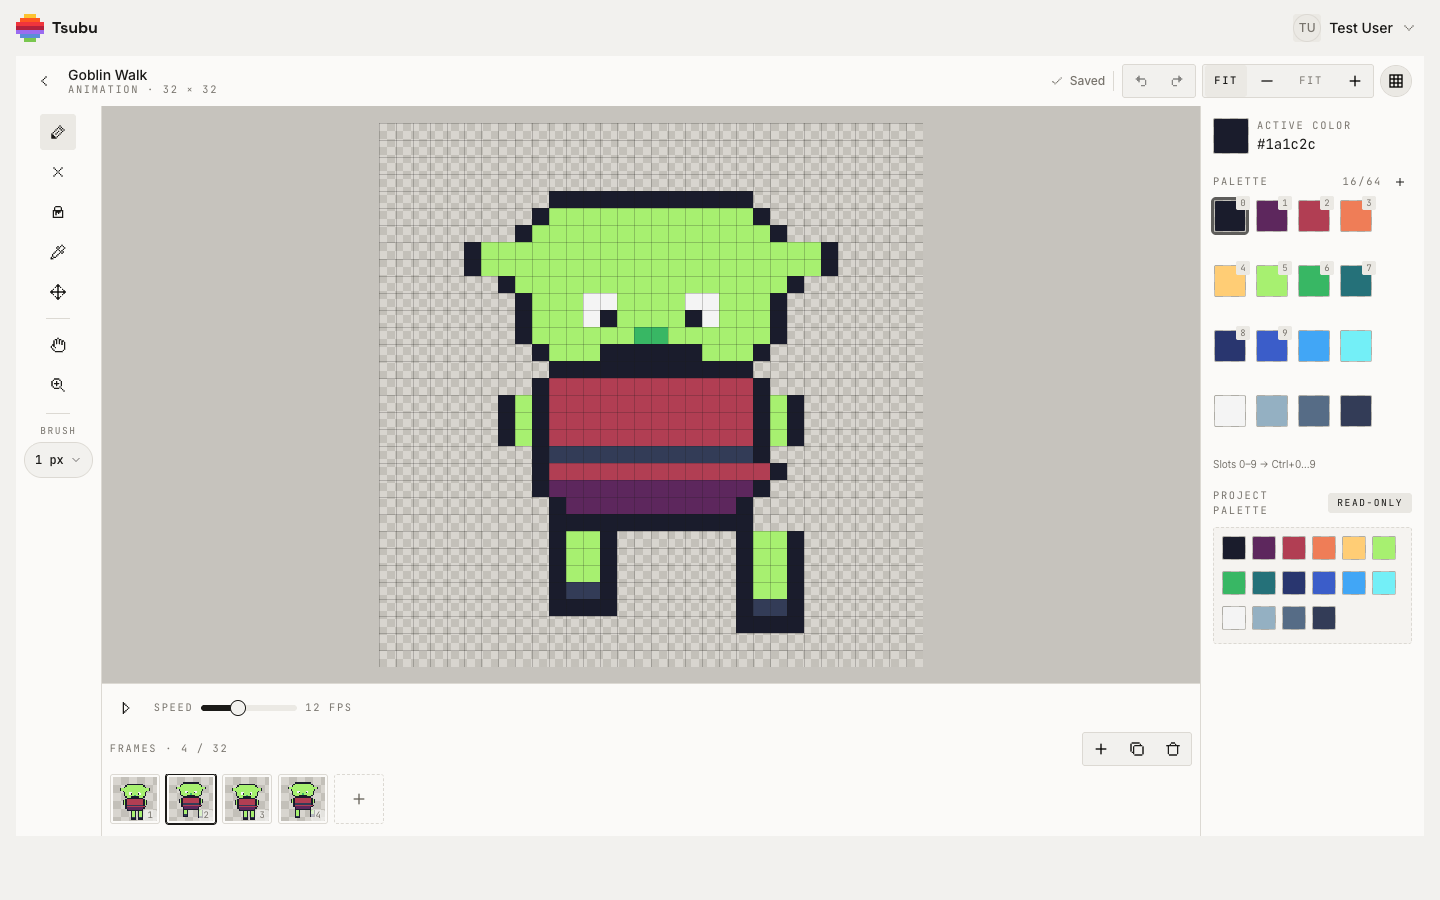
That's the editor mid-exercise with a four-frame goblin walk: a 32 × 32 canvas over the transparency checkerboard, the playback row with Speed at 12 FPS, Frames · 4 / 32 beside the add / duplicate / delete controls, and the filmstrip below with frame 2 selected for editing.
7. Fix what the loop shows you. Now that it's moving, the errors announce themselves: a foot that slides, an arm that pops, a head that bobs twice per step. Step to the offending frame with , and ., retouch the pixels, Ctrl+Z if you overshoot. Remember that it loops: the last frame has to hand the walk back to the first, so if the cycle hitches once per lap, that seam is where to look. Frames can be dragged along the filmstrip to reorder them, Alt+N inserts a blank frame after the current one, and duplicating a pose holds it for twice as long. When you want a smoother walk, duplicate a passing pose and split the difference — that's how four becomes six, then eight. Everything saves as you work; the header shows when it's stored.
If you'd rather start from an AI draft
Optional, and it is genuinely optional — the cycle above is the craft, and this is a shortcut through the first pass of it. If you already have a finished single sprite in your library, open its menu and choose Animate with AI: describe the motion, pick how many frames you want, and it drafts them onto the timeline. AI animation here always starts from a sprite you already have, so it animates your character rather than inventing a new one.
What comes back is a first pass, not a delivery. The frames land as ordinary editable pixels on the same timeline you just used, and they need the same treatment as your own: flip through them, fix the foot that slides, cut the frame that adds nothing. Uploading a sprite to be animated by AI is something plenty of tools now offer; what matters is whether you can still open frame 3 and move a pixel afterwards. One honest caveat while you weigh it up: the provenance question — what these models were trained on — is unresolved on our side, and we would rather say so than hand-wave it. Treat AI-drafted frames as a draft you edit, and be straightforward about where they came from.
Get the loop out of the browser
A walk cycle that never leaves the tab isn't finished. From the library, open the asset's menu and choose Export:
- Animated GIF — an endlessly looping GIF at the speed you set, which is the devlog / Bluesky / "look what I made" format.
- Sprite sheet — a
.zipholding a packed sheet PNG and its JSON atlas in the familiar Aseprite / TexturePacker shape, with the frame rectangles and durations written out. Columns and padding are yours to set.
Both export at 1×, 2×, 4× or 8×, nearest-neighbour so the pixels stay square, with transparency preserved. (The plain-PNG export is for single-image assets; an animation leaves as motion or as a sheet.)
From there it's your engine's own import step: the sheet plus atlas is the shape Unity, Godot, Phaser and Pixi already understand. We walk through the engine side — canvas sizes, grid-true export and per-engine import — in making pixel art for your game engine. If your frames already exist and you only need them packed, the sprite sheet maker does that one job, and how to make a sprite sheet is the long-form version of the packing step.
Now go make something walk
That's the whole loop, and it is genuinely a loop: four frames, played at a speed you chose by ear, fixed in the places the motion showed you were wrong. Do it once and the fundamentals stop being trivia — you'll know what a passing pose is because you moved a leg to make one.
Open the editor and animate your first sprite — free while we're in early access, sign in with Google. New workflow guides land on the RSS feed.