
Search for a sprite sheet in Phaser and the answers are good, plentiful and all about the same half of the job: this.load.spritesheet, generateFrameNumbers, sprite.play. The official docs, the TexturePacker walkthrough, a dozen Medium posts. Every one of them starts with a sheet that already exists. If you write JavaScript for a living and draw sprites approximately never, that missing sheet is the actual blocker.
So this guide does both halves, in order. First you make a real four-frame walk cycle and export it as a packed PNG plus a JSON atlas, in a browser tab with Tsubu. Then you load it into Phaser with code that matches the frame size you actually exported — including the atlas path, which is the one most tutorials skip, and the two or three places where Phaser 3 and Phaser 4 diverge.
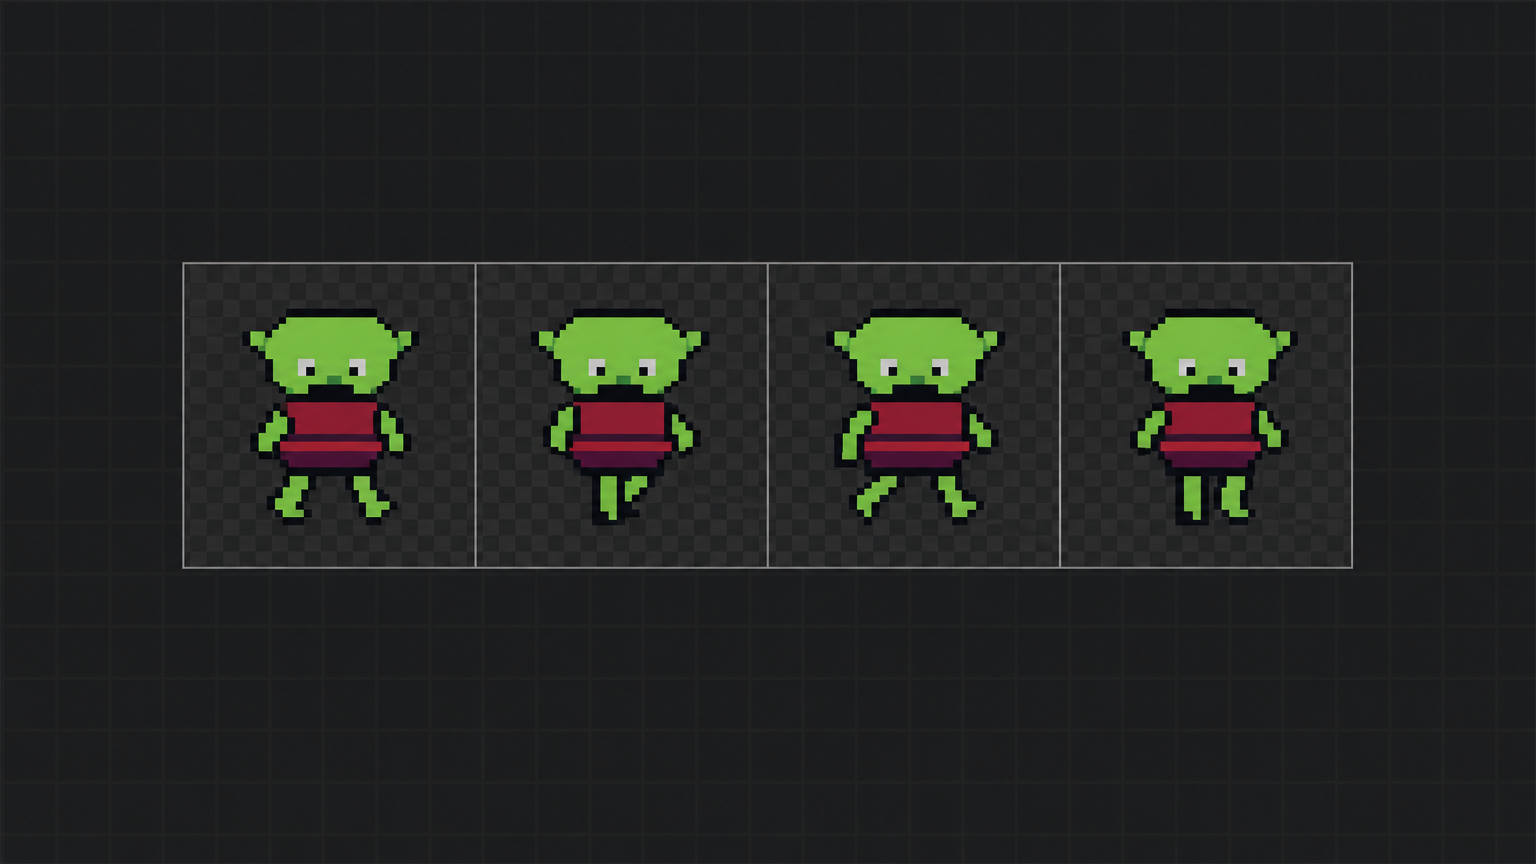
The two ways Phaser reads a sheet
Phaser has two loaders for this, and picking the wrong one is where the afternoon goes.
this.load.spritesheet(key, url, { frameWidth, frameHeight })— for a uniform grid. You tell Phaser the cell size; it walks the texture in fixed steps and numbers the frames 0, 1, 2, 3… No metadata file involved. This is the path for a walk cycle, and the one you want by default.this.load.atlas(key, textureURL, atlasURL)— for a packed sheet whose frames are trimmed, rotated or simply different sizes. Phaser reads the rectangles out of the JSON instead of assuming a grid, and you address frames by name. The docs are precise about what it will accept: "Phaser expects the atlas data to be provided in a JSON file, using either the JSON Hash or JSON Array format" (API docs, checked 2026-09-02).
Which means the sheet you export has to be honest about which kind it is. Three properties decide that:
- Uniform cells. Every frame occupies the same rectangle. A grid load with a cell size that lies is off by a few pixels on frame 2 and by a whole limb by frame 4.
- A genuinely transparent background. Alpha, not a white square — otherwise your goblin walks around inside a visible tile.
- Real pixels at 1×. A 32 px sprite should be 32 px in the file. Export at 4× and the cell is genuinely 128 px wide, so
frameWidthhas to say 128; declare 32 against that sheet and Phaser dices your four frames into sixty-four.
You also need three numbers written down: cell size, frame count, frame rate. All three end up typed into your preload() and create().
Make the frames
This half is quick, and it's covered in depth elsewhere, so here's the short version with pointers.
Sign in with Google — Tsubu runs entirely in the browser, there's nothing to install — and the studio is free for early adopters while we're in early access, with AI usage sponsored by the platform and no credit cap. In the library, create a project, hit New asset, set the type to Animation, name it, pick a 32 × 32 grid and start with a couple of frames. Draw the contact pose, then duplicate and nudge until you have four. Press play and pull the Speed slider until the walk carries some weight; 12 fps is the default and a sane place to stop.
Two detours if you want them. How to animate pixel art is the long version of that paragraph — frame counts, FPS, and building a four-frame walk cycle pose by pose. How to make pixel art for games is the step before it: canvas size, palette, silhouette, getting one sprite clean before you animate anything. And if drawing the first pose isn't your idea of a good evening, the AI pixel art generator drafts one on a real grid — a first pass you then edit, never a delivery. Said plainly: what these models were trained on is an unresolved question on our side, so treat AI-drafted frames as a draft you own, and disclose them if you ship them.
Export the sheet and its atlas
One thing that catches people: export doesn't live in the editor. Go back to the library, find the asset's card, open its actions menu — the kebab in the card's top-right corner, or right-click the card — and choose Export.
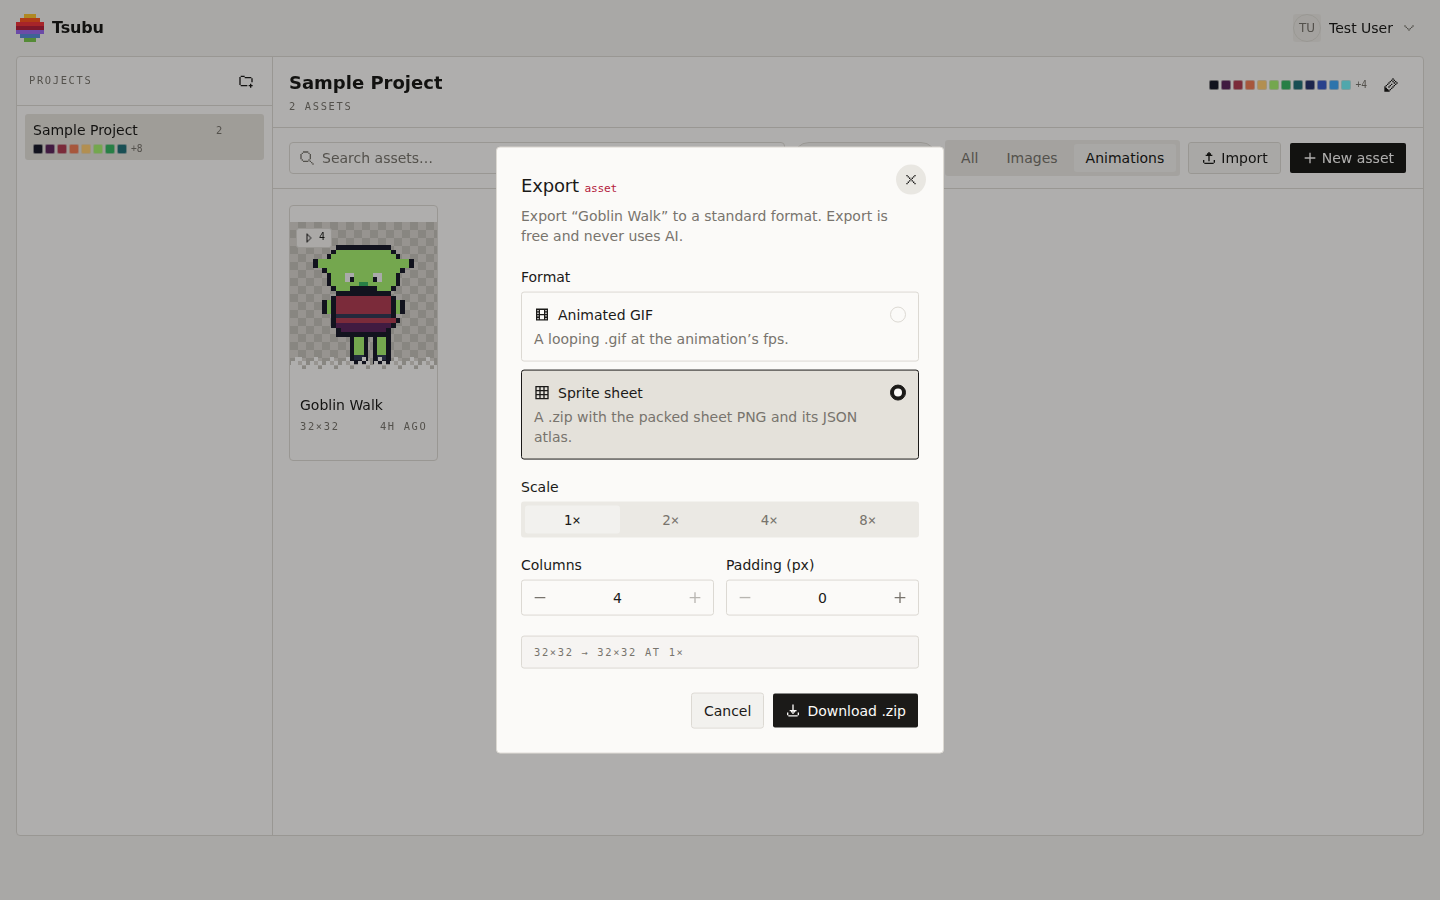
That's the real dialog on a four-frame, 32 × 32 walk cycle. An animation offers two formats: Animated GIF ("a looping .gif at the animation's fps"), fine for a devlog, and Sprite sheet — "a .zip with the packed sheet PNG and its JSON atlas" — which is the one Phaser wants. Select it and three controls appear:
- Scale — 1×, 2×, 4× or 8×, nearest-neighbour. Take 1×. Phaser is perfectly capable of drawing a small texture large, and 1× keeps
frameWidthequal to the number you designed at. The higher scales are for things downstream that refuse to zoom. - Columns — defaults to the frame count, so four frames pack into one horizontal strip. That's the friendliest layout for a grid load, and it's what
generateFrameNumberswalks. Drop it to 2 for a 2 × 2 block if you prefer; Phaser reads either, because it counts cells rather than caring about the shape. - Padding (px) — leave it at 0. Gaps between cells are a thing you then have to describe to the loader (
spacing, below), and a tight grid with nearest-neighbour filtering has nothing to bleed.
The readout at the bottom reports the frame size, not the sheet size: 32×32 → 32×32 AT 1×. There's no packed-sheet preview in the dialog — the card behind it shows the animation, not the sheet; the sheet itself is what lands in the zip. As the dialog says, export is free and never uses AI: it's built from pixels your browser already has. Hit Download .zip.
What's in the zip
The download is goblin-walk-sheet.zip, holding exactly two files: goblin-walk.png and goblin-walk.json.
The PNG is 128 × 32 — four 32 × 32 frames in one row, no gaps, transparency intact.
The JSON is the familiar Aseprite / TexturePacker array atlas. Frame 0 in full:
{
  "frames": [
    {
      "filename": "goblin-walk 0",
      "frame": { "x": 0, "y": 0, "w": 32, "h": 32 },
      "rotated": false,
      "trimmed": false,
      "spriteSourceSize": { "x": 0, "y": 0, "w": 32, "h": 32 },
      "sourceSize": { "w": 32, "h": 32 },
      "duration": 83
    }
  ],
  "meta": {
    "app": "https://tsubu.art",
    "version": "1.0",
    "image": "goblin-walk.png",
    "format": "RGBA8888",
    "size": { "w": 128, "h": 32 },
    "scale": "1",
    "frameTags": [
      { "name": "goblin-walk", "from": 0, "to": 3, "direction": "forward" }
    ]
  }
}
Frames 1 to 3 are the same shape with x at 32, 64 and 96. Four values in there are the ones your Phaser code needs:
frame.w/frame.h— 32. YourframeWidthandframeHeight.meta.size.w÷frame.w— 4. The frame count, so{ start: 0, end: 3 }.duration— 83 ms. 1000 ÷ 83 ≈ 12 fps, yourframeRate.frameTags[0].name—goblin-walk. A ready-made animation key.
The durations are real: 83 ms is the 12 fps you set on the timeline, written out in milliseconds, so the walk plays in your game at the weight you tuned in the browser instead of at whatever the framework defaults to. (It defaults to 24. More on that shortly.)
Drop both files into your project's assets/ folder — or just the PNG, if you take the grid path.
Load and animate it
Four calls, and a whole scene around them. This is the complete thing, not a fragment:
import Phaser from "phaser";

function preload() {
  this.load.spritesheet("goblin", "assets/goblin-walk.png", {
    frameWidth: 32,
    frameHeight: 32,
  });
}

function create() {
  this.anims.create({
    key: "goblin-walk",
    frames: this.anims.generateFrameNumbers("goblin", { start: 0, end: 3 }),
    frameRate: 12,
    repeat: -1,
  });

  this.add.sprite(160, 90, "goblin").play("goblin-walk");
}

new Phaser.Game({
  type: Phaser.AUTO,
  width: 320,
  height: 180,
  render: { pixelArt: true },
  scene: { preload, create },
});
Four things in there are worth saying out loud.
frameWidth is the only thing standing between you and nonsense. It's the one required field of the sprite-sheet config; frameHeight is optional and "uses the frameWidth value if not provided" (loader file-type docs). For a square 32 × 32 cell you could drop frameHeight entirely — write it anyway, so the next person doesn't have to know that rule. The same config takes spacing ("the spacing between each frame in the image") and margin ("the space around the edge of the frames"). Tsubu's packer puts the first cell at 0, 0 and inserts padding only between cells, so if you exported with Padding 4 you want spacing: 4, margin: 0 — and if you left Padding at 0, you want neither.
generateFrameNumbers is inclusive and zero-based. Four frames is { start: 0, end: 3 }, not end: 4. The atlas gives you the count directly: meta.size.w ÷ frame.w.
frameRate is not optional in practice. Phaser's animation config documents it as "the frame rate of playback in frames per second (default 24 if duration is null)" (animation config docs). Leave it out and your carefully-tuned 12 fps walk plays at double speed. repeat: -1 is the documented value for looping forever — "-1 for infinity"; the default is 0, which plays the cycle once and leaves your character standing mid-stride.
Animations created on this.anims are global. They live on the scene's Animation Manager, not on the sprite, so ten goblins can play("goblin-walk") without ten copies of the data. Create once in create(), play on as many sprites as you like.
The atlas path, for packed sheets
The grid loader assumes uniform cells. The moment your sheet stops being a uniform grid — trimmed frames, mixed sizes, several animations packed together by a tool that optimised for space — the grid lies, and you want the JSON instead:
function preload() {
  this.load.atlas(
    "goblin",
    "assets/goblin-walk.png",
    "assets/goblin-walk.json",
  );
}

function create() {
  this.anims.create({
    key: "goblin-walk",
    frames: this.anims.generateFrameNames("goblin", {
      prefix: "goblin-walk ",
      start: 0,
      end: 3,
    }),
    frameRate: 12,
    repeat: -1,
  });

  this.add.sprite(160, 90, "goblin", "goblin-walk 0").play("goblin-walk");
}
Note the trailing space in prefix. Tsubu writes frame names as <slug> <index> — goblin-walk 0, goblin-walk 1 — the same convention Aseprite uses, so prefix: "goblin-walk " with start: 0, end: 3 rebuilds them exactly. (generateFrameNames also takes suffix and zeroPad, for atlases whose names look like ruby_0001.) Because the frames are addressed by name, you can also hand one straight to this.add.sprite(...) as the initial texture, as above.
For a Tsubu export both paths work — the sheet is a uniform grid and it ships the JSON, so you can pick by taste. Use the grid load for a single animation and the atlas load when you want names, or when the sheet came from a packer that trimmed it. Plenty of tools produce Phaser-ready sheets and JSON, and TexturePacker's Phaser tutorial is the reference for that route; it's a good tool and this isn't a competition. The difference here is that the frames stay editable in the same browser tab, so "the walk is a frame too short" is a two-minute fix rather than a round trip through three programs.
Phaser 3 vs Phaser 4
Phaser 4 is out (v4.2.1, published July 2026) and it is a genuinely large release — but almost none of it lands on this page.
The four calls above are the standard, current API. The signatures quoted here come from the current documentation, and Phaser's own v3-to-v4 migration guide has no section for the loader or the Animation Manager: its breaking changes are the WebGL renderer (pipelines became render nodes), FX and masks becoming filters, the tint system, camera and shader internals, Geom.Point, and removed game objects such as Mesh and Plane. As it puts it, "if your game only uses the standard Phaser API (Sprites, Text, Tilemaps, etc.), the new renderer should work transparently."
Where it does bite you is the pixel-art setting, and that's worth getting right, because it's the difference between crisp pixels and mush. Phaser's Phaser 4 Pixel Art Guide documents two options:
{ render: { pixelArt: true } }— the long-standing one, described there as "a shortcut for settingantialiasandantialiasGLtofalse" plusroundPixels. The guide's advice with this setting on: "avoid scaling, rotating, and zooming."{ render: { smoothPixelArt: true } }— new in Phaser 4, and it "automatically deactivates the config optionpixelArt". It reaches crisp pixels by a different route, one that tolerates transformation: with it, "you need to scale up your game objects."
The guide's own decision rule is short: smoothPixelArt if you want to scale and rotate game objects, pixelArt if you'd rather not. A fixed-scale 2D scene like the sample above is happy with pixelArt. A camera that zooms, or sprites you rotate, is the case smoothPixelArt was added for. If you're on Phaser 3, pixelArt is the one you have.
When it still looks wrong
Five symptoms, in the order they show up:
- Blurry, soft-edged sprites. No pixel-art render config, so the texture gets the renderer's default smoothing. Add
render: { pixelArt: true }(orsmoothPixelArton Phaser 4, and scale your objects up). - Frames sliced half a character off.
frameWidthdoesn't match the file. Almost always because the sheet was exported at 2× or 4× — the atlas'sframe.wtells you the truth, and it's in exported pixel space, so a 4× export of a 32 px sprite genuinely wantsframeWidth: 128. - Slivers of the neighbouring frame at the edges. The sheet has padding the loader doesn't know about. Set
spacingto the padding you exported with, or re-export at Padding 0. - The walk plays at double speed. No
frameRatein the animation config, so it ran at the documented default of 24. The atlas'sduration: 83is your 12. - Nothing on screen, no error. Usually the animation key versus the texture key:
generateFrameNumbers("goblin", …)takes the texture key frompreload, whileplay("goblin-walk")takes the animation key fromanims.create. They're different strings and they're easy to swap. If you took the atlas path, check the frame name has its space in it —goblin-walk 0, notgoblin-walk0.
Where this goes next
- Only need the packing step? If your frames already exist as loose files or a GIF, the sprite sheet maker does that one engine-agnostic job — bring them in, pack, download the sheet and atlas. It names Unity, Godot, Phaser and Pixi evenly and doesn't bake in any engine's quirks.
- Shipping on more than one engine? Pixel art for your game engine is the cross-engine overview: canvas sizes, grid-true export and per-engine import for Unity, Godot, Phaser and Pixi.
- Want the packing job explained? How to make a sprite sheet is the long-form version — what a sheet and an atlas are, frame sizes, padding, and the questions everyone asks the first time.
- Also building in Unity? Sprite sheet for Unity is this post's twin on the other side: Sprite Mode Multiple, a grid slice, Point filtering and Pixels Per Unit.
Make the sheet you're missing
The Phaser side is now a short list you own: load with the frame size the atlas gave you, generate the frames inclusive from zero, set frameRate to the fps you tuned and repeat: -1, and turn on the pixel-art render option your major version wants. Four calls, and they stop being interesting the second time you write them.
The other half is the sprite — and that's the part no loader tutorial can hand you.
Open the editor and make your first Phaser sprite sheet — free while we're in early access, sign in with Google. New workflow guides land on the RSS feed.