
The first Defold sprite sheet question is rarely about code. It's about which resource to use. Defold has two that hold sprite graphics, an atlas and a tile source, and the names don't tell you which one takes a sheet. Drop a packed sheet into an atlas and Defold treats the whole strip as one image. You get one wide picture and no frames.
This guide covers both halves of the job. First you draw (or draft, then fix) a four-frame walk cycle in a browser tab with Tsubu and export it as a packed sheet with uniform frames. Then you set it up in Defold: a tile source with the right tile size, a flipbook animation, a sprite component that plays it, and the project setting that keeps the pixels crisp. Every Defold step below was checked against the official manuals on defold.com (tile source, atlas, importing 2D graphics, sprite, flipbook animation, texture filtering and adapting graphics to screen size) on 2026-10-07.
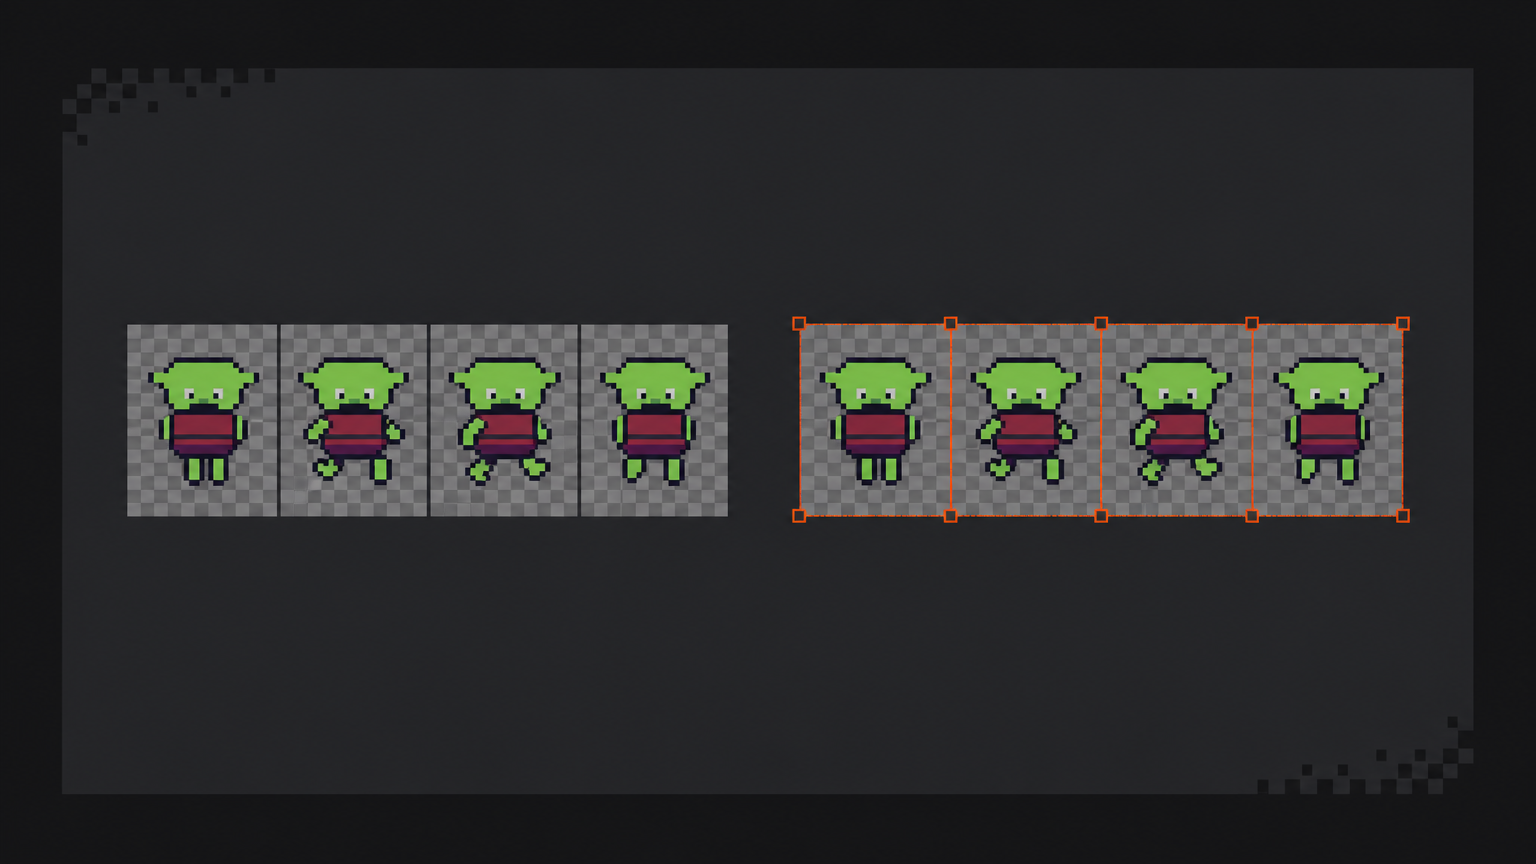
Atlas or tile source?
The manuals answer this, but the answer is split across two pages:
- An atlas "contains a list of separate images files, which are automatically combined into a larger texture image." You give it one file per frame, and Defold does the packing. Its flipbook animations are Animation Groups: a named list of those separate images.
- A tile source "references an image file that is already made out to consist of smaller sub-images ordered on a uniform grid." The importing graphics manual adds: "Another term commonly used for this type of compound image is sprite sheet." Its flipbook animations are "defined by the first and last tile for the animation."
So a packed sheet, where the frames are already laid out on a grid in one PNG, belongs in a tile source. An atlas is the right choice when your frames are separate files, or when you want Defold to pack many unrelated images into one texture for you. A sprite can use either one. Tile maps are the exception: "Tile maps cannot use atlas sources."
A tile source has one rule that shows up again and again on the Defold forum: an animation's frames "must lie next to each other in a sequence left to right. The sequence can wrap from one row to the next." You can't pick frames 12, 20, 28 and 36 out of a column. When a user asked exactly that in a 2025 forum thread, the answer from the Defold team was: "You need to change the source image or use individual images and create an atlas instead." So the sheet you export needs its frames in playback order, left to right. The export below does that by default.
Make the frames
This part is quick, and other posts cover it in depth.
Sign in with Google. Tsubu runs in the browser, so there's nothing to install. During early access the studio is free for early adopters, and AI usage is sponsored by the platform with no credit cap. In the library, create a project, click New asset, set the type to Animation, name it (this example uses Goblin Walk), pick a 32 × 32 grid and start with a couple of frames. Draw the first contact pose, then duplicate it and adjust until you have four frames. Press play and move the Speed slider until the walk looks right. 12 fps is the default and a good place to stop.
The order of the frames in the timeline is the order they land in the sheet, which is the order Defold plays them. If a frame is in the wrong place, drag it in the timeline before you export. That's easier than fixing tile numbers later.
Want more detail? How to animate pixel art builds a four-frame walk cycle pose by pose. If you'd rather not draw the first pose yourself, the AI pixel art generator can draft one on a real grid. Treat that as a first pass you edit, not a finished sprite. One honest note: what these models were trained on is still an open question on our side, so treat AI-drafted frames as a draft you own, and disclose them if you ship them.
Export a sheet with uniform frames
You don't export from inside the editor. Go back to the library, find the asset's card and open its actions menu (the kebab in the card's top-right corner, or right-click the card). Choose Export.
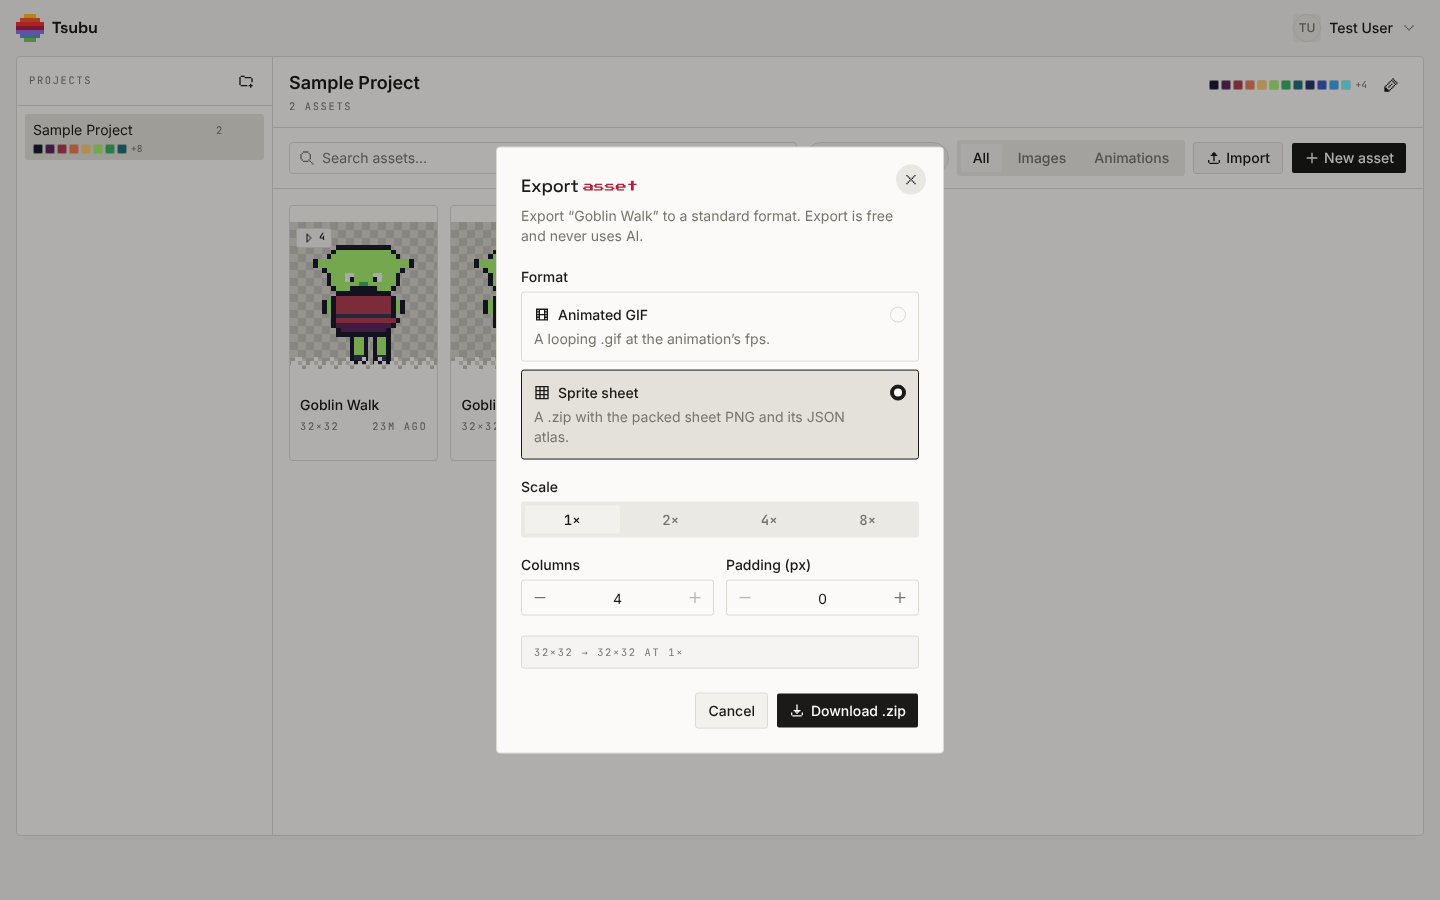
That's the real dialog, opened on the four-frame, 32 × 32 Goblin Walk. Choose Sprite sheet ("a .zip with the packed sheet PNG and its JSON atlas") rather than Animated GIF. Three controls decide the numbers you'll type into Defold:
- Scale: 1×. Defold can zoom a small sprite up on screen (see the last section), so there's no need to bake the zoom into the file. At 1× the tile size you type matches the size you drew. At 4× the frames are 128 px, and so is the tile size.
- Columns: 4. This defaults to the frame count, so the four frames pack into one row, left to right in timeline order. That's exactly the sequence a tile source animation wants.
- Padding (px): 0. Padding is the gap Tsubu leaves between cells. At 0 there are no gaps, so the tile source's margin and spacing fields both stay at 0.
The line at the bottom shows the frame size, not the sheet size: 32×32 → 32×32 AT 1×. As the dialog says, export is free and never uses AI. Click Download .zip.
The download is goblin-walk-sheet.zip, with two files inside. goblin-walk.png is 128 × 32: four 32 × 32 frames in one row at x = 0, 32, 64 and 96, with no gaps and transparency intact. That PNG is the only file the tile source needs. goblin-walk.json is an atlas in the Aseprite / TexturePacker array format, which other engines read directly. The Defold steps below don't use it, but keep it open. It holds the numbers you're about to type: frame.w and frame.h are 32, each frame's duration is 83 ms (1000 ÷ 83 ≈ 12 fps), and the frame tag runs from: 0 to: 3. Keep that last one in mind, because Defold counts differently.
Create the tile source
The steps from the tile source manual:
- Import the PNG. Drag
goblin-walk.pngfrom your file system into a folder in the Assets pane. Defold takes PNG and JPEG. - Create the tile source. Right-click a folder in the Assets pane and choose New... ▸ Tile Source. Name it, for example
goblin_walk. It opens in the tile source editor. - Pick the image. Click the browse button next to the Image property and select
goblin-walk.png. The sheet appears in the editor. - Set the properties. The manual's test is simple: "When everything is correct the tiles will line up perfectly."
For the 128 × 32 export, the properties are:
| Property | Value | Why |
|---|---|---|
| Image | goblin-walk.png | The sheet from the zip |
| Size | 128 × 32 | Read-only: the size of the source image. If it shows 512 × 128, you exported at 4× |
| Tile Width | 32 | The dialog readout, or frame.w in the JSON |
| Tile Height | 32 | The dialog readout, or frame.h in the JSON |
| Tile Margin | 0 | "The number of pixels surrounding each tile." Tsubu adds no border |
| Tile Spacing | 0 | "The number of pixels between each tile." This is Tsubu's Padding, and it's 0 |
| Inner Padding | 0 | Adds empty pixels around each tile in the texture built when the game runs, not in your PNG |
| Extrude Border | 0 | Repeats each tile's edge pixels in that runtime texture. Raise it to 1 if you ever see edge lines (below) |
| Collision | (empty) | Only needed if you want collision shapes generated from the tiles |
Inner Padding and Extrude Border don't describe your file. They change the texture Defold builds from it, so leave them at 0 unless you have a problem to fix.
Define the walk animation
Every new tile source already has one animation, named anim. Select it in the Outline (or add another by right-clicking the tile source root and choosing Add ▸ Animation) and set its properties:
| Property | Value | Notes |
|---|---|---|
| Id | walk | Must be unique within the tile source. This is the name your code uses |
| Start Tile | 1 | Defold numbers tiles from 1, not 0 |
| End Tile | 4 | The last frame of the walk |
| Playback | Loop Forward | Plays first to last, again and again |
| Fps | 12 | The speed you tuned in the browser (the JSON's 83 ms per frame) |
| Flip horizontal | off | Handy for a left-facing copy, but you can also flip at runtime (see below) |
Tiles start at 1. The manual says: "Numbering starts at 1 in the top left corner and goes to the right, line by line down to the bottom right corner." The JSON's frame tag says 0 to 3, which is the usual zero-based count. Type 0 to 3 into Defold and the walk is off by one. In Defold it's 1 to 4.
The other playback modes are None (shows the first frame only), Once Forward, Once Backward, Once Ping Pong, Loop Backward and Loop Ping Pong. A walk or idle loops. An attack or a jump usually plays once.
If you exported a grid instead of a row
Export the same walk with Columns: 2 and the PNG is 64 × 64: frames 1 and 2 on the top row, 3 and 4 underneath, filled left to right and top to bottom. Tile Width and Height are still 32. Because a tile source animation "can wrap from one row to the next", Start Tile 1 and End Tile 4 still play the walk in order. Tsubu always fills rows in timeline order, so any Columns value gives you a sequence Defold can play.
If one sheet holds several animations (say a walk and an idle in the same asset), each animation needs its own unbroken run of tiles. Put the frames for each one next to each other in the timeline before you export, then give each animation its own Start and End Tile.
Put it on a sprite
A tile source is a resource. To see the goblin, a sprite component has to use it. From the sprite manual and the components docs:
- Add a game object to your collection, for example
goblin. - Add a sprite. Right-click the game object in the Outline and choose Add Component, then Sprite. (Add Component File adds a reference to a separate sprite file instead. Either works.)
- Set the Image to
goblin_walk.tilesource. With a single-sampler material, such as the default one, this field is called Image. A custom material with several samplers shows one field per sampler instead. - Set the Default Animation to
walk. Leave Size Mode onAutomatic, which lets the editor set the sprite's size for you.
Run the game and the sprite plays its Default Animation: the goblin walks at 12 fps, with no code needed.
Switch animations from a script
Once you have more than one animation, play them by name from a script on the same game object. The flipbook manual uses sprite.play_flipbook():
function init(self)
    -- "#sprite" is the sprite component's id on this game object
    sprite.play_flipbook("#sprite", hash("walk"))
end
If you renamed the component, use that id instead of sprite. A few related calls from the same manuals:
- Face left:
sprite.set_hflip("#sprite", true)flips the animation horizontally, so you don't need a mirrored copy of the frames. - Change the speed: the sprite's
playback_rateproperty can be set withgo.set("#sprite", "playback_rate", 0.5)for half speed. The Fps in the tile source stays 12. - Chain animations:
sprite.play_flipbook()takes an optional callback that runs when the animation ends. The manual notes it "is never called for looping animations", so use it onOnceanimations such as an attack, not on the walk.
Keep the pixels crisp
Zoom the goblin up and Defold's default settings blur it. The texture filtering manual explains why. There are two settings, default_texture_min_filter and default_texture_mag_filter, and "If you don't specify anything, both are set to linear by default." Linear filtering averages each pixel with its neighbours, which is what makes pixel art look soft.
Open game.project, go to the Graphics section and set both Default Texture Min Filter and Default Texture Mag Filter to nearest. In the file itself that's:
[graphics]
default_texture_min_filter = nearest
default_texture_mag_filter = nearest
The manual describes nearest filtering as the one to choose "if you want a perfect one-to-one pixel mapping from your textures to what you see on screen". Two caveats from the same pages:
- Custom materials have their own setting. The game.project values apply to the default samplers. If your sprite uses a custom material that declares its own samplers, set the filter on each sampler in the material.
- Turn off sub-pixel positions. In game.project, the Sprite section has a Subpixels checkbox ("Check to allow sprites to appear unaligned with respect to pixels"). The screen size manual suggests disabling it for retro games, so sprites "always snap to the nearest full pixel".
To make a 32 px goblin big enough to see, zoom the camera rather than re-exporting at 4×. The screen size manual's retro example renders a 320 × 200 game in a 1280 × 800 window with msg.post("@render:", "use_fixed_projection", { zoom = 4 }), or with a Camera component set to Orthographic Projection and an Orthographic Zoom of 4.0. Whole-number zooms keep every source pixel the same size on screen.
If the goblin still looks wrong
- The whole strip shows at once. The sprite's Image is an atlas that holds the sheet as a single image. A packed sheet goes in a tile source.
- Tiles don't line up in the tile source editor. Tile Width or Height doesn't match the file. Check Size: if it's 512 × 128, the sheet was exported at 4× and the tiles are 128 px. Re-export at 1× or type the scaled size.
- The walk starts on the wrong pose or shows a blank frame. The animation uses 0 to 3. Defold counts tiles from 1, so use 1 to 4.
- The frames play in the wrong order. The order in the sheet is wrong, and a tile source can't reorder it. Drag the frames into place in the Tsubu timeline and export again.
- A thin line from the next frame at the edge. Set Extrude Border to 1 in the tile source. If you exported with padding, set Tile Spacing to match, or re-export at Padding 0.
- Soft, blurry edges. The min/mag filters are still
linear, or a custom material's sampler overrides them. - The walk is too fast or too slow. Check the animation's Fps (12) and any
playback_rateset from a script.
Where this goes next
- Have your frames already, just need them packed? The sprite sheet maker handles that one job and isn't tied to any engine. Bring in a GIF or an existing sheet (or draw the frames) and download a packed sheet with its JSON. Plenty of tools pack sheets, including free ones, and TexturePacker has its own Defold tutorial built around an editor extension. What's different here is that the frames stay editable in the same tab.
- Making sprites for a whole game, not just this sheet? Pixel art for games covers the full workflow: canvas sizes, grid-true export and why nearest filtering matters in every engine.
- Also shipping in another engine? The same Goblin Walk goes into GameMaker as a strip in sprite sheet in GameMaker and into PixiJS with its JSON in PixiJS sprite sheet.
Make the sheet you're missing
On the Defold side you now have a short checklist: a tile source (not an atlas) for a packed sheet, Tile Width and Height equal to the frame size, margin and spacing at 0, an animation from tile 1 to tile 4 on Loop Forward at 12 fps, a sprite with that tile source and default animation, and nearest filtering in game.project.
That leaves the sprite itself, which is the part no import tutorial can give you.
Open the editor and make your first Defold sprite sheet. You sign in with Google, and it's free while we're in early access. New workflow guides are posted to the RSS feed.