
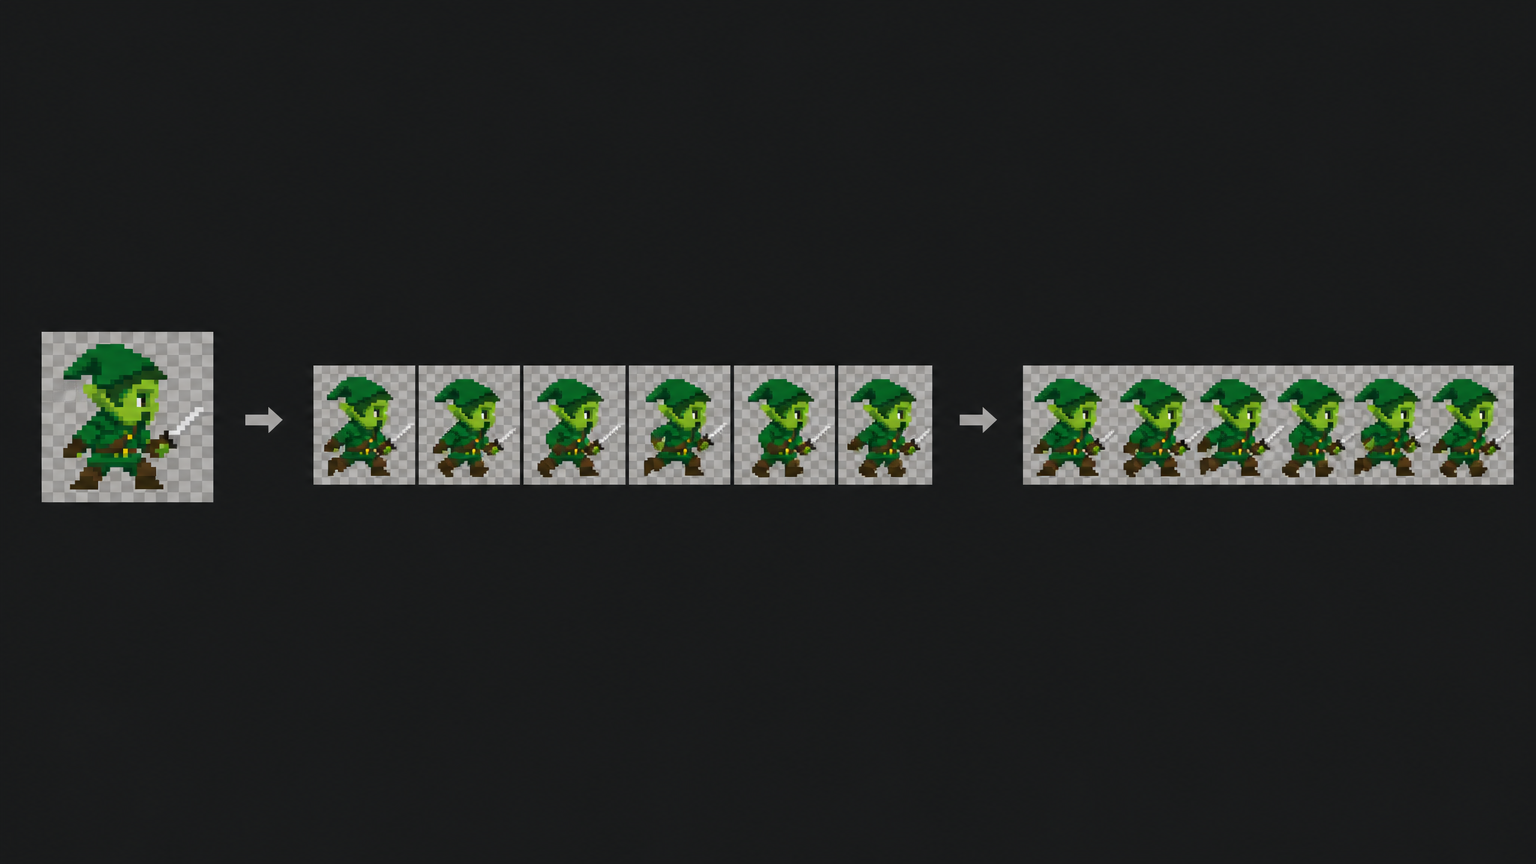
A walking character, a spinning coin, an idle flame — in a 2D game, that motion is almost always a sprite sheet: one image holding every frame of an animation, side by side, plus a little metadata that tells your engine where each frame lives. This is a practical, do-it-with-me guide. By the end you'll have gone from a single frame to a packed sheet and a JSON atlas your engine can slice, and you'll have done it entirely in the browser with Tsubu.
What a sprite sheet actually is
A sprite sheet is two things travelling together:
- The sheet — a single PNG that packs each animation frame into its own cell. Loading one texture is faster and tidier than loading twenty loose files.
- The atlas (the metadata) — a small file, usually JSON, that records the rectangle for every frame (
x,y,width,height) and often its display duration. Your engine reads the atlas to know where frame 3 of the walk cycle sits, without you eyeballing pixel coordinates.
The frames themselves are just the poses of your animation in order: a six-frame walk cycle is six drawings of the same character, each a step further into the stride. Get those frames right, keep them the same size, and packing them is the easy part.
What you'll need
Just a browser. Tsubu runs entirely in the browser — no install, no download. Sign in with Google and your library is there on any machine. It's free for early adopters while we're in early access, with AI usage sponsored by the platform and no credit cap — so you can follow this whole tutorial without spending anything.
Step 1 — Get your frames
There are two honest ways to start. Pick whichever fits how you work; you can mix them freely.
Draw them by hand (the blank-canvas start)
Open the editor and start a new sprite at a real pixel size — 16×16 for a small character or UI icon, 32×32 when you want more room for detail. Whatever you choose, every frame in the animation has to share that exact size, so the engine can slice the finished sheet on a fixed grid.
Draw your first pose with the pencil, lean on a small palette so the whole cycle stays consistent, and keep the background transparent. Then build the cycle frame by frame: duplicate the frame you just drew, nudge the arm, shift the legs, and repeat. Four frames read as a walk; six or eight read as a smooth one.
Or start from an AI first pass (optional)
Sometimes you just need a starting grain, fast. Describe what you want — "a small green forest adventurer facing right" — and Tsubu drafts a finished sprite with the discipline real pixel art needs: a readable silhouette, a limited palette, clean edges and a transparent background, aligned to the grid rather than a blurry, downscaled photo.

Here's the part that matters for a tutorial like this: the draft comes back as real, editable pixels on the grid, not a flattened picture. It's a first pass, not a finished asset. AI is opt-in, it drafts and you refine, and because you keep every pixel it's yours to edit and honest to disclose — worth being transparent about where your frames come from, especially in a scene that cares. Below is that generated sprite imported into the Tsubu editor as a single 32×32 frame: the pixel grid, the tool rail, a constrained palette, and the animation timeline previewing at 12 FPS, all ready for you to refine the pose and add the rest of the cycle.
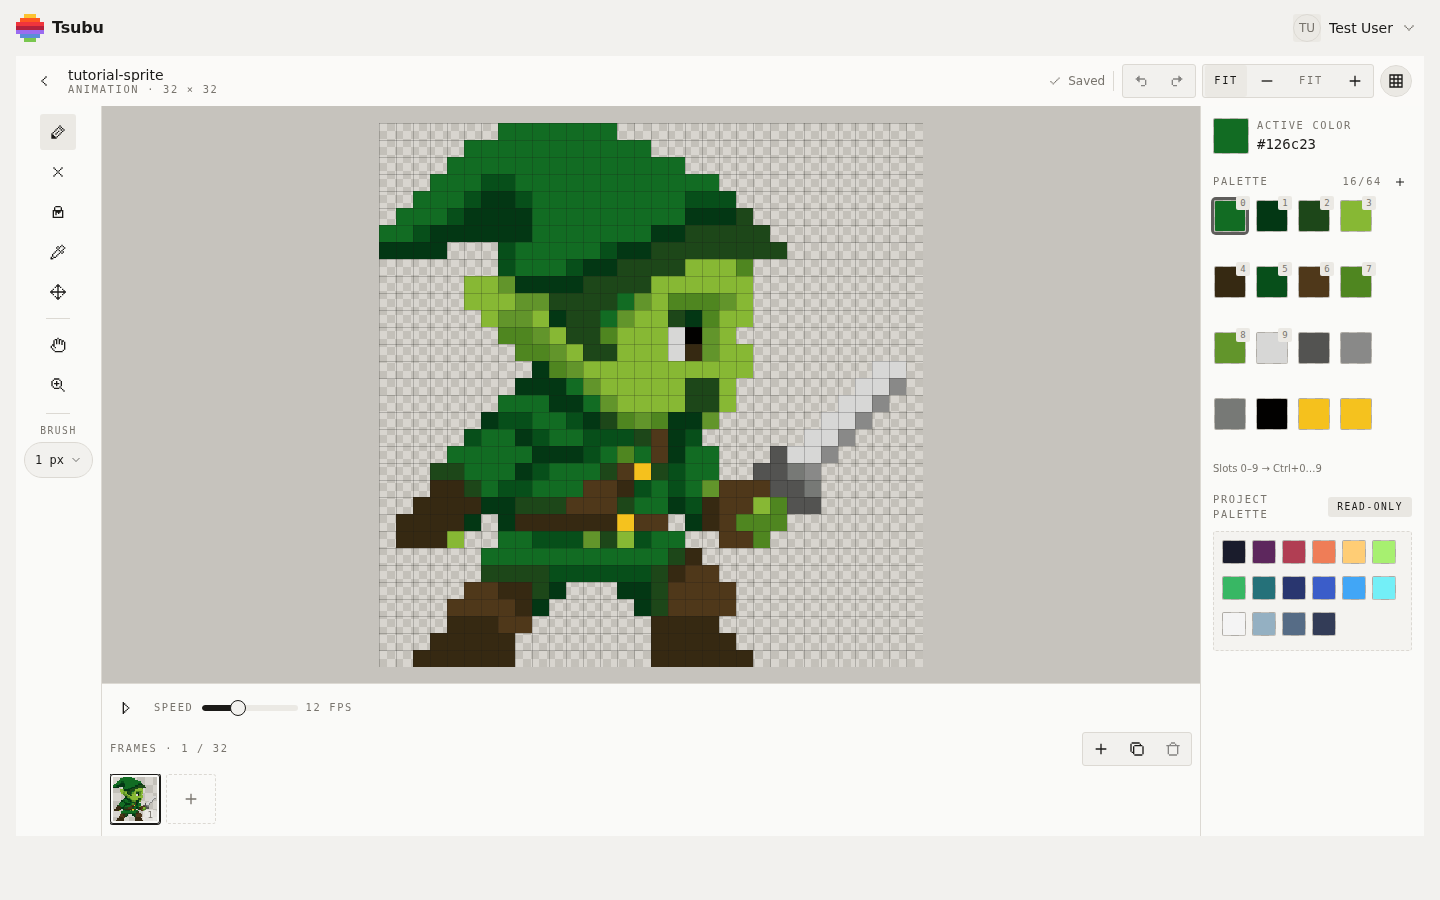
Already sitting on a finished GIF or an old PNG sheet from another tool? You can import it instead: bring the file in, tell Tsubu the frame size, and it lands as an editable animation on the timeline — the same starting point as the two paths above.
Step 2 — Animate on the timeline
However your frames got here, they now live on a filmstrip timeline. Reorder them, duplicate the ones you want to hold longer, and scrub the loop. Set the playback speed to taste — 8 to 12 FPS is the classic range for a walk; idles sit slower, attacks run faster. Every frame stays plain, editable pixels the whole time, so fixing a stray pixel on frame 4 is one click away. When the loop reads right in preview, it'll read right in your game.
Step 3 — Pack it into a sheet + atlas
This is the payoff. Export the animation and Tsubu packs every frame into a single PNG and writes a JSON atlas alongside it, in the familiar Aseprite / TexturePacker shape — frame rectangles, durations and sheet metadata included. An entry looks like this:
{
  "frames": {
    "walk_0": {
      "frame": { "x": 0, "y": 0, "w": 32, "h": 32 },
      "duration": 100
    },
    "walk_1": {
      "frame": { "x": 32, "y": 0, "w": 32, "h": 32 },
      "duration": 100
    }
  },
  "meta": { "size": { "w": 192, "h": 32 }, "scale": "1" }
}
Because the coordinates live in the atlas, your engine reads exact rectangles instead of guessing a grid. Need a still frame instead? Export a clean PNG scaled 1× to 8× with transparency preserved. Need a quick share for a devlog? One-click animated GIF.
If you already have your frames prepared and only want the packing step — drop files in, preview, download the sheet and atlas — that job has its own home: our sprite sheet maker does exactly that, and this tutorial's editor workflow feeds straight into it.
Padding, frame size and the questions people ask
A few things that trip people up the first time:
- What frame size should I use? Keep it uniform. 16×16 and 32×32 are the common pixel-character sizes; every frame in one sheet must match so the grid stays honest. Different animations can use different sizes — just keep each sheet internally consistent.
- Do I need padding between frames? For pixel art rendered at integer scales with nearest-neighbour (point) filtering, tight packing is usually fine. A 1–2 px gap or edge extrusion helps prevent neighbouring frames bleeding in when a frame is drawn at a non-integer scale. Since the atlas stores exact rectangles, your engine samples the right pixels either way.
- Does the sheet need to be a power of two? Modern engines don't require it. Power-of-two dimensions are a harmless old habit for maximum GPU compatibility, not a rule you have to follow.
- What's in the metadata? Per frame: its rectangle and duration. Per sheet: the overall size (and scale). That's what lets an importer rebuild the animation exactly, in order and at the right speed.
Drop it into your engine
The sheet and atlas are engine-ready. Concisely, per engine:
- Unity — import the PNG and slice it in the Sprite Editor (uniform grid or from the atlas rects).
- Godot — load the sheet and read the frames into a
SpriteFrames/AnimatedSprite2D. We go deeper on this — H/V frames,SpriteFramesandAnimationPlayer— in making sprite sheets for Godot. - Phaser — feed the atlas JSON directly to the loader and play by frame names.
- Pixi — hand the atlas to the loader and pull textures by frame key.
For the fuller picture across engines — canvas sizes, grid-true export and import guidance — see making pixel art for your game engine. None of this replaces your engine's own import step; the point is that Tsubu hands off a sheet and atlas that fit the shapes these engines already understand.
Make your first sheet
That's the whole loop: draw or generate your frames, animate them on the timeline, and export a packed sheet plus a JSON atlas that slots into your project. The fastest way to learn it is to make one.
Open the editor and build your first sprite sheet — it's free while we're in early access. Prefer to follow along by email? New workflow guides land on the RSS feed.